Creamy Coconut Poke Cake
Prep Time: 15 minutes | Bake Time: 35 minutes | Chill Time: 2–8 hours | Serves: 12–15
Let me paint you a picture. It is a warm afternoon, you need to bring a dessert somewhere in a few hours, and you have about 20 minutes of actual energy left in you. Maybe it is a summer cookout. Maybe it is a church potluck. Maybe it is a birthday party and you completely forgot until this morning. Whatever the scenario — this Creamy Coconut Poke Cake is your answer, and it is a very good answer.
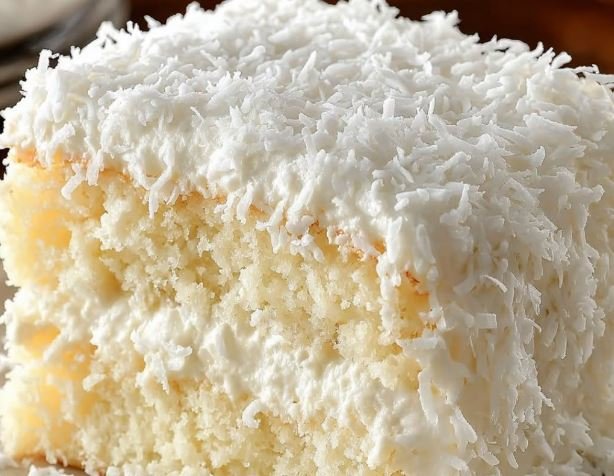
Here is what happens: you bake a simple white cake, poke holes all over it while it is still warm, and pour a luscious mixture of cream of coconut and sweetened condensed milk over the top. That mixture sinks down into every single hole and soaks through the entire cake, turning an ordinary box mix into something so moist and creamy and deeply coconut-flavored that people will genuinely not believe you when you tell them how easy it was. Then you top it with a cloud of fluffy whipped cream and a generous layer of toasted coconut that adds just the right amount of crunch.
It goes into the fridge, you go live your life, and a few hours later you pull out a cake that tastes like it spent a week marinating in tropical coconut dreams. It is honestly a little unfair how good it is for how little effort it requires.
Why This Cake Has Been on My List for Years
I have been making poke cakes for as long as I can remember, but the coconut version holds a special place for me. There is something about the combination of that creamy, sweet cream of coconut soaking all the way through a soft white cake — every single bite is equally moist, equally flavored, equally good from the corner piece to the dead center. No dry spots. No uneven distribution. Just wall-to-wall coconut creaminess in every square inch of the pan.
And then there is that toasted coconut on top. I know some people skip the toasting step and I understand — it is one extra thing and you are already busy. But please do not skip it. The two or three minutes it takes to toast the coconut transforms it from soft and sweet into golden, slightly crunchy, and deeply nutty — and that textural contrast against the soft, creamy cake underneath is what takes this from a good dessert to a genuinely great one.
This cake also gets better as it sits. Make it the night before a party and it will be even more incredible the next day. The coconut filling has more time to soak in, the flavors settle and deepen, and the whipped topping firms up into a beautiful, sliceable layer. It is one of those rare make-ahead desserts that actually rewards your patience.
One Thing You Need to Know Before You Start
This comes up every single time someone makes this cake for the first time, so let me save you the trip to the wrong aisle at the grocery store.
Cream of coconut is not the same as coconut milk. They are completely different products.
Cream of coconut — look for brands like Coco Lopez or Goya Cream of Coconut — is thick, rich, and very sweet. It is typically found in the cocktail mixer aisle, near the margarita mix and grenadine, because it is also used to make piña coladas. It is what makes this cake taste like a dessert and not like a savory curry.
Coconut milk is thin, mostly unsweetened, and lives in the international foods aisle. It is wonderful for cooking but will make your poke cake watery, bland, and sad. Do not use it here.
Find the cream of coconut. It is worth the extra minute of searching, I promise.
What Makes This Recipe Work
- The poke method — this is the whole magic trick. Poking deep holes all over the warm cake while it is fresh from the oven, then immediately pouring the coconut mixture over the top, means the filling sinks down into the cake instead of just sitting on the surface. Every bite from top to bottom is infused with coconut flavor. This is the technique that separates a poke cake from a regular frosted cake — and once you understand it, you will use it for everything.
- Cream of coconut plus sweetened condensed milk — cream of coconut alone is delicious, but combining it with sweetened condensed milk creates a filling that is richer, creamier, and more complex. The condensed milk adds a caramel-like depth and extra body that helps the filling soak into the cake and stay there rather than pooling at the bottom of the pan.
- Poking while warm — a warm cake is more porous and absorbent than a cold one. Pour the filling over a fully cooled cake and most of it will sit on the surface. Pour it over a warm cake and it gets pulled down through the holes by gravity and absorbed into the crumb. Warm cake is the key.
- Toasted coconut on top — that golden crunch on top is not just decorative. It adds texture, it adds a deeper, nuttier coconut flavor, and it makes the cake look like it came from a bakery. Two minutes in a dry pan or a few minutes in the oven. Worth every second.
- Time in the refrigerator — this cake genuinely needs time to chill. A minimum of two hours, but overnight is where it truly shines. The filling continues to soak and distribute evenly through the cake as it chills, and by the next morning the whole thing is one perfectly uniform, deeply flavored, impossibly moist slice of coconut heaven.
Ingredients
For the Cake
- 1 box (15.25 oz) white cake mix, plus ingredients listed on the box (typically eggs, oil, and water)
- 1 tsp pure coconut extract (adds a big boost of coconut flavor to the base)
- 1 tsp pure vanilla extract
For the Coconut Cream Soak
- 15 oz can cream of coconut, well stirred (Coco Lopez or Goya — NOT coconut milk)
- 14 oz can sweetened condensed milk
For the Topping
- 8 oz Cool Whip, thawed (or 2 cups freshly whipped heavy cream — see notes)
- ½ tsp pure coconut extract
- 1 ½ cups sweetened shredded coconut, toasted
Optional Garnish
- Maraschino cherries
- A drizzle of honey or caramel sauce
- Fresh pineapple slices for a tropical presentation
Instructions
Step 1 — Bake the Cake
Preheat your oven to 350°F (175°C). Spray a 9×13-inch baking pan generously with nonstick cooking spray.
Prepare the white cake mix according to the directions on the box — but add the coconut extract and vanilla extract to the batter before mixing. This small addition makes a genuinely noticeable difference in how coconutty the finished cake tastes. Mix until smooth, pour into the prepared pan, and bake according to package directions, usually 30 to 35 minutes, until a toothpick inserted in the center comes out clean.
Step 2 — Toast the Coconut
While the cake is baking, toast your shredded coconut. Spread it in an even layer on a dry baking sheet and place it in the oven alongside the cake — but keep a very close eye on it. It only needs about 5 to 8 minutes and goes from pale to beautifully golden to burned very quickly. Stir it once or twice while it toasts. The moment it turns golden and you can smell that warm, nutty fragrance, pull it out and transfer it immediately to a cool plate or bowl — it will keep toasting on the hot pan if you leave it there.
Alternatively, toast it in a dry skillet over medium heat, stirring constantly, for 2 to 3 minutes. Same result, slightly more control.
Step 3 — Poke and Soak
This is the step. As soon as the cake comes out of the oven, use the handle of a wooden spoon to poke holes all over the entire surface — deep holes, all the way to the bottom of the pan, spaced about every inch. Do not be shy about this. More holes means more filling getting into the cake, which means a moister, more flavorful result. Poke away.
In a medium bowl, whisk together the cream of coconut and sweetened condensed milk until fully combined and smooth. The cream of coconut can separate in the can, so make sure you stir it well before opening or shake the can thoroughly. Pour the entire mixture slowly and evenly over the warm, poked cake, making sure it covers every inch of the surface and seeps down into the holes.
Let it sit for about 10 minutes and watch as the cake absorbs the filling right before your eyes. It looks like a lot of liquid at first. That is okay. The cake can handle it.
Step 4 — Chill
Allow the cake to cool completely at room temperature — about 30 minutes — then cover tightly with plastic wrap and refrigerate for at least 2 hours. Overnight is genuinely better if you can plan ahead. Do not frost a warm cake; the Cool Whip will melt and slide right off.
Step 5 — Frost and Top
When the cake is completely cold and the filling has fully absorbed, spread the Cool Whip evenly over the entire surface in a smooth, generous layer. Stir the coconut extract into the Cool Whip before spreading for an extra layer of coconut flavor in the topping.
Scatter the toasted coconut over the top, covering the surface completely. If you are using maraschino cherries or fresh pineapple as garnish, add them now for a beautiful, tropical presentation.
Step 6 — Serve
Cover loosely and return to the refrigerator until you are ready to serve. This cake is best served cold, straight from the fridge. Cut into squares and serve directly from the pan — it is not a cake that needs to be lifted out and plated. It is a pan dessert, and there is absolutely nothing wrong with that.
Recipe Notes
- Stir the cream of coconut before using. The fat in cream of coconut separates and rises to the top during storage. Give the can a very good stir before pouring, or shake it well. A lumpy or uneven soak means some parts of the cake get more filling than others.
- Poke deep and poke often. Shallow holes do not let the filling reach the bottom of the cake. Push the spoon handle all the way to the base of the pan for maximum soak.
- Real whipped cream works beautifully. If you prefer to skip the Cool Whip, whip 2 cups of heavy cream with 2 tablespoons of powdered sugar and ½ teaspoon of coconut extract until stiff peaks form. The flavor is richer and more natural — the only trade-off is that homemade whipped cream does not hold up as long in the fridge. Serve within a day of frosting for the best result.
- Overnight chilling is the move. I know two hours feels like enough. And technically it is. But overnight is when this cake becomes truly spectacular. The filling distributes completely throughout the cake, the flavors deepen and mellow, and every single bite is uniform from top to bottom. If you can make it the day before, do it.
- Add the toasted coconut right before serving if you want it to stay crunchy. Toasted coconut sitting on top of Cool Whip will soften after a couple of hours as it absorbs moisture from the topping. For maximum crunch, add it just before you put the cake on the table. For a softer topping that travels better, add it a few hours ahead.
- Do not use a yellow cake mix. White cake mix gives you a lighter, more delicate crumb that lets the coconut filling be the star. Yellow cake mix has a buttery flavor that competes with the coconut rather than complementing it.
- This cake is on the sweet side. That is the nature of the beast — cream of coconut and sweetened condensed milk are both very sweet. If you want to tone it down slightly, use only the cream of coconut and skip the condensed milk. Still delicious, just less intensely sweet. Or use unsweetened coconut flakes for the topping instead of sweetened.
Variations
Piña Colada Poke Cake — Add a 20 oz can of drained crushed pineapple to the bottom of the pan before pouring in the batter. The pineapple bakes right into the cake and creates a fruity, tropical base that turns this into a full piña colada experience. Add a splash of coconut rum to the cream of coconut soak if you are making this for adults. No one will complain.
Chocolate Coconut Poke Cake — Start with a chocolate cake mix instead of white, and add a drizzle of melted dark chocolate over the toasted coconut topping. The bittersweet chocolate against the sweet coconut filling is an unexpectedly wonderful combination — like an Almond Joy bar in cake form.
Lemon Coconut Poke Cake — Use a lemon cake mix as the base and add 1 tablespoon of fresh lemon zest to the coconut soak. The citrus brightness cuts through the richness of the cream of coconut and makes this version feel lighter and more refreshing — perfect for spring.
Toasted Coconut Cream Cheese Frosting Version — Swap the Cool Whip for a simple cream cheese frosting: beat 8 oz softened cream cheese with 1 cup powdered sugar and ½ teaspoon coconut extract until smooth, then fold in 1 cup of Cool Whip for lightness. This version is richer and slightly tangier — absolutely incredible.
Coconut Rum Poke Cake — Stir 2 tablespoons of good coconut rum into the cream of coconut soak before pouring it over the cake. This is a grown-up version that is perfect for summer parties and pairs beautifully with a cold drink on the porch.
Mini Individual Coconut Poke Cakes — Bake the batter in a muffin tin, poke holes in each warm cupcake, drizzle with the coconut soak, chill, and top with a dollop of Cool Whip and a sprinkle of toasted coconut. Adorable, portable, and perfect for parties where everyone wants their own individual dessert.
Make-Ahead Tips
This is genuinely one of the best make-ahead desserts you will ever encounter. It is practically designed to be made in advance.
- Make the whole cake the day before. Bake, soak, chill, frost, and top — all the night before. Cover with plastic wrap and refrigerate. By the next day the flavors are deeper, the texture is even more moist and uniform, and you have zero dessert stress on the day of your event.
- Toast the coconut up to 3 days ahead. Store the toasted coconut in an airtight container at room temperature. It stays perfectly crunchy until you need it.
- The soak mixture can be made ahead too. Whisk together the cream of coconut and condensed milk, cover, and refrigerate for up to 3 days. Just give it a stir before using since it may separate slightly.
What to Serve With It
Honestly, this cake needs nothing. It is a complete experience on its own. But if you are building out a full dessert table or brunch spread:
- A scoop of coconut sorbet or vanilla bean ice cream alongside a cold slice is genuinely incredible
- Fresh tropical fruit — mango, pineapple, kiwi, papaya — on the side adds a fresh, bright contrast to the richness
- A cold glass of sweet tea, lemonade, or a piña colada for the full tropical experience
- Strong black coffee or espresso for anyone who wants to balance the sweetness
Storage
Refrigerator: Because of the cream-based filling and the Cool Whip topping, this cake must be refrigerated. Cover tightly with plastic wrap and store for up to 4 to 5 days. It genuinely gets better with each passing day for the first two or three days as the flavors continue to develop. After that it starts to go the other way, so eat it while it is at its best.
Freezer: You can freeze this cake — whole or in individual slices — for up to 2 months. The texture of the Cool Whip changes slightly after freezing and thawing, becoming a little denser and less fluffy. If that bothers you, freeze without the topping and add fresh Cool Whip and toasted coconut after thawing. Thaw overnight in the refrigerator.
Reheating: Please do not microwave this cake. It is a cold dessert. It is meant to be eaten cold, right from the fridge. That is when it is at its best — creamy, firm, cold, and coconutty. Room temperature is fine too, but cold is how it was meant to be enjoyed.
Did you make this Creamy Coconut Poke Cake? I really hope it saved your afternoon the way it has saved mine more times than I can count. Leave a comment below and tell me how it went — and if you made it the night before and it was even better the next day, I want to hear about that too. Tag us on social media with your beautiful pans of toasted coconut goodness. 🥥☀️