Glazed Buttermilk Beignet Squares
Prep Time: 20 minutes | Rise Time: 1–1½ hours | Fry Time: 20 minutes | Makes: 16–20 squares
Can I tell you something? I spent years thinking beignets were one of those things you could only truly enjoy in New Orleans, sitting at a sticky café table with powdered sugar all over your shirt and a café au lait in your hand. Something that just did not translate to a regular home kitchen on a regular Tuesday morning.
I was completely wrong.
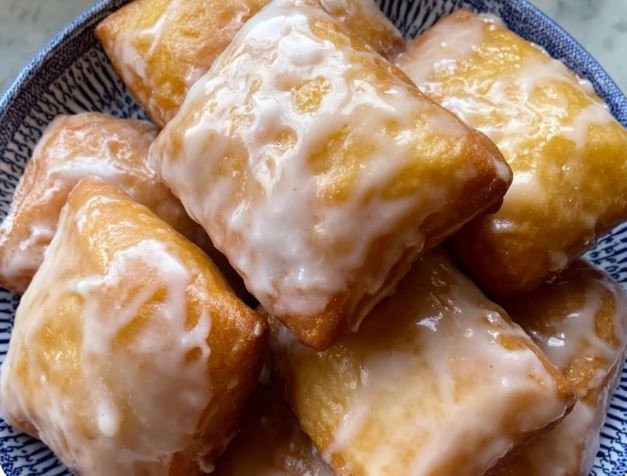
These Glazed Buttermilk Beignet Squares are soft, pillowy, golden squares of pure joy — crispy at the edges, impossibly tender in the middle, and finished with a smooth vanilla glaze that sets into the most beautiful, delicate sugary shell. They are everything you love about the classic New Orleans pastry, but made right in your own kitchen, with a buttermilk dough that is richer and more flavorful than the original — and a glossy glaze that, honestly, I think I prefer over the traditional powdered sugar cloud that sends everyone into a sneezing fit anyway.
Make these once, and you will completely understand why they have taken over every food page on the internet.
Why You’ll Love This Recipe
Where do I even start. These beignets come together with simple pantry staples you probably already have. The dough is forgiving and easy to work with even if you have never made a yeast dough before. The frying is quick — we are talking about 2 minutes per side — and the glaze takes less time to make than it does to wait for the oil to heat up. Start to finish, you are looking at a couple of hours, most of which is hands-off rise time while you go do something else entirely.
And then there is the taste. That buttermilk tang in the dough. That golden, slightly crisp exterior giving way to a soft, airy, cloud-like center. That glaze setting into a thin, crackly shell that shatters just a little when you bite through it. I genuinely cannot think of a better way to start a weekend morning. Or end a long week. Or celebrate absolutely nothing in particular, because sometimes that is reason enough.
A Little Background on Beignets
Beignets have been around for centuries. They came to Louisiana with French settlers and over time became so deeply woven into New Orleans culture that they are now the official state doughnut of Louisiana — yes, that is a real thing, and it is a great thing. The most famous version is the one served at Café Du Monde, where they arrive in piles of three, buried under a snowstorm of powdered sugar, next to a cup of chicory coffee.
This version is a little different and, if you ask me, a little better for home baking. Instead of the traditional powdered sugar finish, these squares get a vanilla glaze that clings to every surface and sets into something glossy and sweet without the mess. The buttermilk in the dough adds a Southern richness and a gentle tang that makes each bite feel more complex and deeply satisfying than a standard beignet. And cutting the dough into squares instead of individual shapes means no scraps, no waste, and a perfectly rustic look that is charming in the most effortless way.
What Makes This Recipe Work
- The buttermilk dough — buttermilk is doing a lot of heavy lifting here. Its acidity tenderizes the gluten in the flour, resulting in a dough that fries up incredibly light and soft rather than dense and chewy. It also adds that subtle tang that makes these squares taste more complex and interesting than your average fried dough. Real buttermilk, not a substitute, is strongly recommended — the flavor difference is noticeable.
- Active dry yeast — this is what gives the beignets their signature puffed, airy rise. The yeast creates air bubbles in the dough during the rise, and when those hit the hot oil, they expand dramatically — which is what creates that gorgeous, pillowy interior. Do not skip the bloom step; it is what guarantees your yeast is alive and your beignets will rise properly.
- Rolling to ½-inch thickness — this is thicker than most people expect, and it is intentional. Thick squares give you that satisfying, substantial bite and that beautiful bakery-style profile. Thinner dough fries up too fast, too flat, and too crispy all the way through — which is not what we are going for here.
- Frying at exactly 350°F — temperature control is everything with fried dough. Too hot and the outside burns before the inside is cooked. Too cool and the dough absorbs too much oil and comes out greasy and heavy. A candy thermometer is your best friend here. Use it.
- Glazing while still warm — the glaze sticks beautifully to a warm beignet and sets into that perfect shell as the square cools. Let them cool too long before glazing and the glaze slides right off. The window is about 5 to 10 minutes after coming out of the oil — warm enough to grab the glaze, cool enough to handle.
Ingredients
For the Buttermilk Beignet Dough
- 2 ¼ tsp active dry yeast (1 standard packet)
- ¾ cup warm buttermilk (105–110°F — warm but not hot)
- ¼ cup warm water
- 3 tbsp granulated sugar
- 1 large egg, room temperature
- 3 tbsp unsalted butter, melted and slightly cooled
- 1 tsp pure vanilla extract
- ½ tsp fine salt
- 3 cups all-purpose flour, plus more for dusting
For Frying
- 4 to 6 cups neutral oil (vegetable, canola, or sunflower)
For the Vanilla Glaze
- 2 cups powdered sugar, sifted
- 3 to 4 tbsp whole milk
- 1 tbsp unsalted butter, melted
- 1 tsp pure vanilla extract
- A pinch of fine salt
Instructions
Step 1 — Bloom the Yeast
In a large mixing bowl, combine the warm buttermilk, warm water, and granulated sugar. Sprinkle the yeast over the top and give it a gentle stir. Let it sit undisturbed for 5 to 10 minutes until the surface is covered in a thick, foamy layer. This foam is your confirmation that the yeast is alive, active, and ready to make your beignets rise beautifully.
If nothing happens after 10 minutes — no foam, no bubbles, nothing — your yeast may be expired or your liquid may have been too hot and killed it. Start over with fresh yeast. This is one step where you cannot fake it.
Step 2 — Make the Dough
Add the egg, melted butter, and vanilla extract to the yeast mixture and stir to combine. Add the salt, then gradually add the flour one cup at a time, stirring after each addition, until a soft, slightly sticky dough comes together. It will be tacky — that is completely normal and exactly right. Do not add extra flour to fix it; a stickier dough makes a softer, airier beignet.
Turn the dough out onto a lightly floured surface and knead for about 8 to 10 minutes until it is smooth, elastic, and springs back slightly when you poke it. If the dough is sticking to the counter, dust lightly — emphasis on lightly — with a little more flour as you go.
Step 3 — First Rise
Shape the dough into a ball and place it in a lightly greased bowl. Cover the bowl with plastic wrap or a clean kitchen towel and set it somewhere warm and draft-free. Let the dough rise for 1 to 1½ hours, until it has visibly doubled in size.
My favorite trick for a perfect rise environment: turn the oven on to 200°F for 5 minutes, then turn it completely off. Place the covered bowl inside with the oven door slightly ajar. The residual warmth is just right for yeast.
Step 4 — Roll and Cut
Once the dough has doubled, turn it out onto a lightly floured surface. Punch it down gently to release the gas and roll it out to about ½ inch thick — this is thicker than you might think, and it is intentional. Using a sharp knife or a pizza cutter, cut the dough into 2-inch squares. A rustic, slightly imperfect look is completely fine — that is part of the charm.
Place the squares on a lightly floured baking sheet, spacing them slightly apart. Cover loosely with a kitchen towel and let them rest for 15 to 20 minutes while you heat the oil. This short rest allows the dough to relax and puff up slightly, which means an even airier beignet in the fryer.
Step 5 — Make the Glaze
While the squares rest, make your glaze. In a medium bowl, whisk together the sifted powdered sugar, melted butter, vanilla extract, and salt. Add the milk one tablespoon at a time, whisking after each addition, until the glaze is smooth, glossy, and thick enough to coat the back of a spoon without running off immediately. Set it nearby — you will need it the moment the beignets come out of the oil.
Step 6 — Fry the Beignets
Pour the neutral oil into a large, heavy-bottomed pot or Dutch oven to a depth of about 3 inches. Heat over medium heat until the oil reaches 350°F (175°C). Use a candy or deep-fry thermometer to monitor the temperature throughout frying — maintaining that temperature consistently is the single most important thing you can do for perfect beignets.
Working in batches of 3 to 4 squares at a time — do not overcrowd the pot — carefully lower the dough squares into the hot oil. They will puff up almost immediately, which never gets less exciting. Fry for 1 to 2 minutes per side, turning once, until each square is evenly golden brown all over. Remove with a slotted spoon and drain on a paper towel-lined plate or wire rack.
Allow the oil to return to 350°F between batches before adding the next set of squares.
Step 7 — Glaze While Warm
This is the step everyone looks forward to. When the beignets are cool enough to handle but still warm — about 5 minutes out of the oil — dip the top of each square into the glaze, letting the excess drip off, then place it glaze-side up on a wire rack. Alternatively, drizzle the glaze generously over the squares with a spoon for a more casual, rustic finish.
Let the glaze set for a few minutes — it will firm up slightly and develop that gorgeous, slightly crackly shell. Then serve immediately while still warm.
Recipe Notes
- Real buttermilk makes a difference. In a pinch, you can make a substitute by stirring 1 tablespoon of white vinegar or lemon juice into ¾ cup of regular milk and letting it sit for 5 minutes until it curdles slightly. But if you can use real buttermilk, use it. The flavor in the finished beignet is noticeably richer and more complex.
- Do not rush the rise. A properly risen dough — doubled in size, visibly puffy, full of air bubbles — is what gives you beignets with that light, airy center. An under-risen dough produces dense, doughy squares that no amount of hot oil can fix.
- Roll thicker than you think. Half an inch feels almost too thick when you are rolling. Trust it. That thickness is what gives you that satisfying, substantial bite and that gorgeous profile when the beignets puff in the oil.
- Use a thermometer for the oil. This is not optional. Guessing the oil temperature leads to either greasy, undercooked dough or burned exteriors. A $10 candy thermometer makes all the difference.
- Fry in small batches. Adding too many squares at once drops the oil temperature and the beignets will absorb oil instead of frying properly. Three to four squares at a time, with the temperature coming back up to 350°F between batches, is the right approach.
- Glaze while warm, not hot. Hot beignets fresh from the fryer are too wet with surface oil for the glaze to grab. Wait about 5 minutes — warm enough to set the glaze beautifully, cool enough to handle without burning yourself.
- Eat them the same day. Like all fried yeast dough, these beignets are at their absolute best within a couple of hours of frying. They soften and lose that magical crispy-tender texture as they sit. Make them when you are ready to eat them, not in advance.
Variations
Cinnamon Sugar Beignet Squares — Skip the glaze entirely. Instead, toss the warm beignets in a bowl of cinnamon sugar — 1 cup granulated sugar mixed with 1 ½ teaspoons cinnamon. Roll quickly while the surface is still slightly oily from the fryer and the sugar will stick beautifully. A nod to the classic New Orleans tradition with a warm spiced twist.
Lemon Glazed Beignet Squares — Add the zest of one lemon and 1 tablespoon of fresh lemon juice to the vanilla glaze in place of one of the tablespoons of milk. Bright, citrusy, and absolutely perfect in spring and summer.
Maple Glazed Beignet Squares — Replace the vanilla extract in the glaze with pure maple syrup and add ¼ teaspoon of cinnamon. The maple glaze against the buttermilk dough is a warm, deeply comforting combination that feels made for fall mornings.
Chocolate Glazed Beignet Squares — Whisk 2 tablespoons of unsweetened cocoa powder into the powdered sugar before adding the milk, or substitute 2 tablespoons of the milk for melted dark chocolate. Finish with a few flaky sea salt crystals on top and try not to eat them all before they reach the plate.
Stuffed Beignet Squares — Before cutting the dough, place small teaspoons of Nutella, strawberry jam, or vanilla pastry cream on one half of the rolled dough, evenly spaced. Fold the other half of the dough over the filling, press the edges to seal, then cut into squares and fry as directed. The filled version is extra indulgent and very, very good.
Baked Version — Preheat your oven to 450°F (230°C). Place the cut squares on a parchment-lined baking sheet, brush generously with melted butter, and bake for 8 to 10 minutes until golden. The texture will be closer to a tender biscuit than a fried beignet, but it is a lighter, less messy option that is still genuinely delicious. Brush with a second coat of melted butter straight from the oven before glazing.
What to Serve With Them
Beignets were born to be eaten with coffee. That is just the truth. But here are a few more ideas if you are building out a brunch spread:
- A strong café au lait or chicory coffee — the classic New Orleans pairing that started it all
- Hot chocolate — thick, dark, and just sweet enough to complement the vanilla glaze
- Fresh berries and whipped cream on the side for a brunch presentation
- A scoop of vanilla ice cream served alongside a warm beignet for dessert
- Orange juice, mimosas, or a pitcher of cold brew for a full weekend brunch moment
Make-Ahead Tips
Beignets are genuinely best made fresh, but there are a couple of ways to get a head start:
- Make the dough the night before. After kneading, place the dough in a greased bowl, cover tightly, and refrigerate overnight. The slow, cold rise actually develops a deeper, more complex flavor. The next morning, take it out while the oil heats, let it rest for 20 minutes at room temperature, then roll, cut, and fry as directed.
- Freeze the cut, unbaked squares. Place cut squares on a parchment-lined baking sheet and freeze until solid, then transfer to a freezer bag for up to 1 month. When ready to fry, thaw at room temperature for 30 to 45 minutes until soft and slightly puffy, then fry as directed.
Storage
Honestly? I am not going to pretend these store particularly well, because I would be lying to you. Beignets are a fresh food. They are at their best within an hour or two of coming out of the fryer — warm, glossy, slightly crisp at the edges, soft and pillowy in the center. That texture does not survive overnight.
That said, if you have leftovers — which, to be fair, is unlikely — store them in an airtight container at room temperature for up to 2 days. Reheat in a toaster oven or a regular oven at 350°F for 4 to 5 minutes to bring back some of the crispiness. Do not microwave them — it makes the dough soft and chewy in a way that does not do them justice.
The best approach with beignets is simply to make exactly as many as you plan to eat. Which, in my experience, is always more than you initially thought.
Did you make these Glazed Buttermilk Beignet Squares? I really hope you did — and I really hope you ate them warm, with a good cup of coffee, maybe with someone you like a lot. Leave a comment below and tell me how it went. And if you have powdered sugar on your shirt, that is also acceptable.