Heaven in a Bowl No-Bake Dessert
Ingredients
For the Buttery Crust:
2 cups graham cracker crumbs
½ cup unsalted butter, melted
¼ cup granulated sugar
For the Creamy Peanut Butter Layer:
1 cup creamy peanut butter
8 ounces cream cheese
1 cup powdered sugar, sifted
1 teaspoon pure vanilla extract
1½ cups frozen whipped topping
For the Rich Chocolate Ganache:
1 cup semi-sweet chocolate chips
½ cup heavy cream
Optional Garnishes (for decoration):
⅓ cup roasted salted peanuts, coarsely chopped
½ cup mini chocolate-peanut butter candies (such as Reese’s pieces), halved
Chocolate shavings or additional melted chocolate for drizzling
Instructions
Step 1: Prepare and Chill the Crust
In a medium-sized mixing bowl, combine the graham cracker crumbs, melted butter, and granulated sugar. Stir thoroughly with a fork or rubber spatula until the mixture is evenly moistened and resembles wet sand. Transfer this mixture to a lightly greased 9×13-inch baking dish. Using the flat bottom of a measuring cup or your fingers, press the crumbs firmly and evenly into the bottom of the dish to create a compact, even layer. Place the dish in the refrigerator and chill for at least 10 to 15 minutes to allow the butter to solidify, which will help the crust hold together cleanly when sliced.
Step 2: Make the Fluffy Peanut Butter Mousse
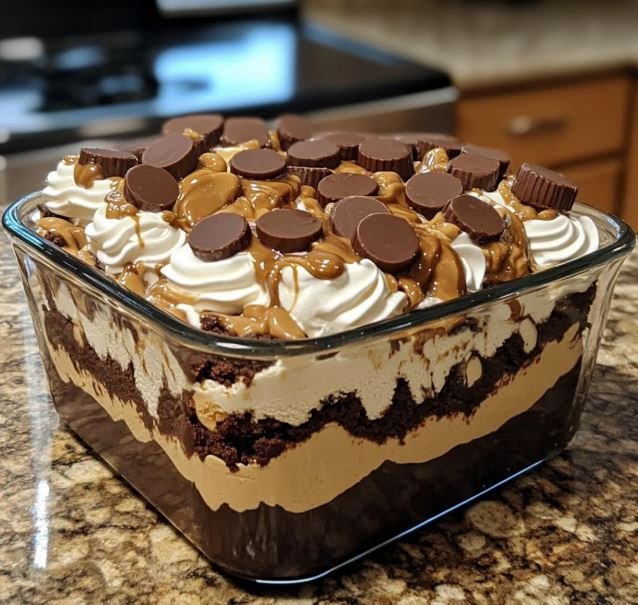
While the crust chills, prepare the filling. In a large mixing bowl, add the softened cream cheese and creamy peanut butter. Using an electric hand mixer or a stand mixer fitted with the paddle attachment, beat on medium speed for 2 to 3 minutes until the mixture is completely smooth, lump-free, and well-combined, scraping down the sides of the bowl as needed. Reduce the mixer speed to low and gradually add the sifted powdered sugar and vanilla extract, beating until fully incorporated and creamy. Turn off the mixer. Using a large rubber spatula, gently fold in the thawed whipped topping. Fold carefully with a wide, sweeping motion from the bottom of the bowl upward to maintain the light, airy volume of the whipped topping—do not overmix. Once the mousse is uniform in color and texture, remove the chilled crust from the refrigerator. Spread the peanut butter mousse evenly over the crust using an offset spatula, smoothing the top to create an even layer.
Step 3: Prepare the Silky Chocolate Ganache
Place the semi-sweet chocolate chips in a medium heatproof bowl. In a small saucepan, heat the heavy cream over medium-low heat, stirring occasionally, until it is steaming and small bubbles form around the edge of the pan—do not allow it to come to a rolling boil. Remove the saucepan from the heat and immediately pour the hot cream over the chocolate chips. Let the mixture stand undisturbed for 2 to 3 minutes to allow the heat to melt the chocolate. After this resting period, gently whisk the mixture in small circles, starting from the center and working outward, until the ganache is completely smooth, glossy, and homogenous. Set the ganache aside at room temperature for approximately 10 to 15 minutes to cool and thicken slightly. This cooling step is crucial: if the ganache is too warm, it will sink into or melt the peanut butter layer; if it is too cool, it will not spread easily.
Step 4: Assemble the Layers
Once the ganache has reached a pourable but slightly thickened consistency (similar to warm syrup), carefully pour it over the peanut butter mousse layer. Tilt the baking dish gently from side to side to allow the ganache to flow and cover the surface evenly. Alternatively, use a small offset spatula to gently spread the ganache to the edges, taking care not to disturb the mousse layer beneath.
Step 5: Chill, Set, and Decorate
Cover the baking dish with plastic wrap or aluminum foil and transfer it to the refrigerator. Chill for a minimum of 4 hours, though overnight chilling (8 to 12 hours) is highly recommended for the cleanest, firmest layers and easiest slicing. Just before serving, garnish the top with the chopped peanuts, halved chocolate-peanut butter candies, and chocolate shavings for added texture and visual appeal.
Step 6: Slice and Serve
To achieve picture-perfect slices, use a large, sharp chef’s knife. Run the knife under very hot water, dry it completely with a clean towel, and make a clean, straight cut. Wipe the knife clean and reheat it between each slice to prevent the layers from smearing. Serve the dessert chilled directly from the refrigerator.