Viral Dot Cake
Prep Time: 20 minutes | Bake Time: 33 minutes | Assembly Time: 15 minutes | Makes: 6–8 dot cakes
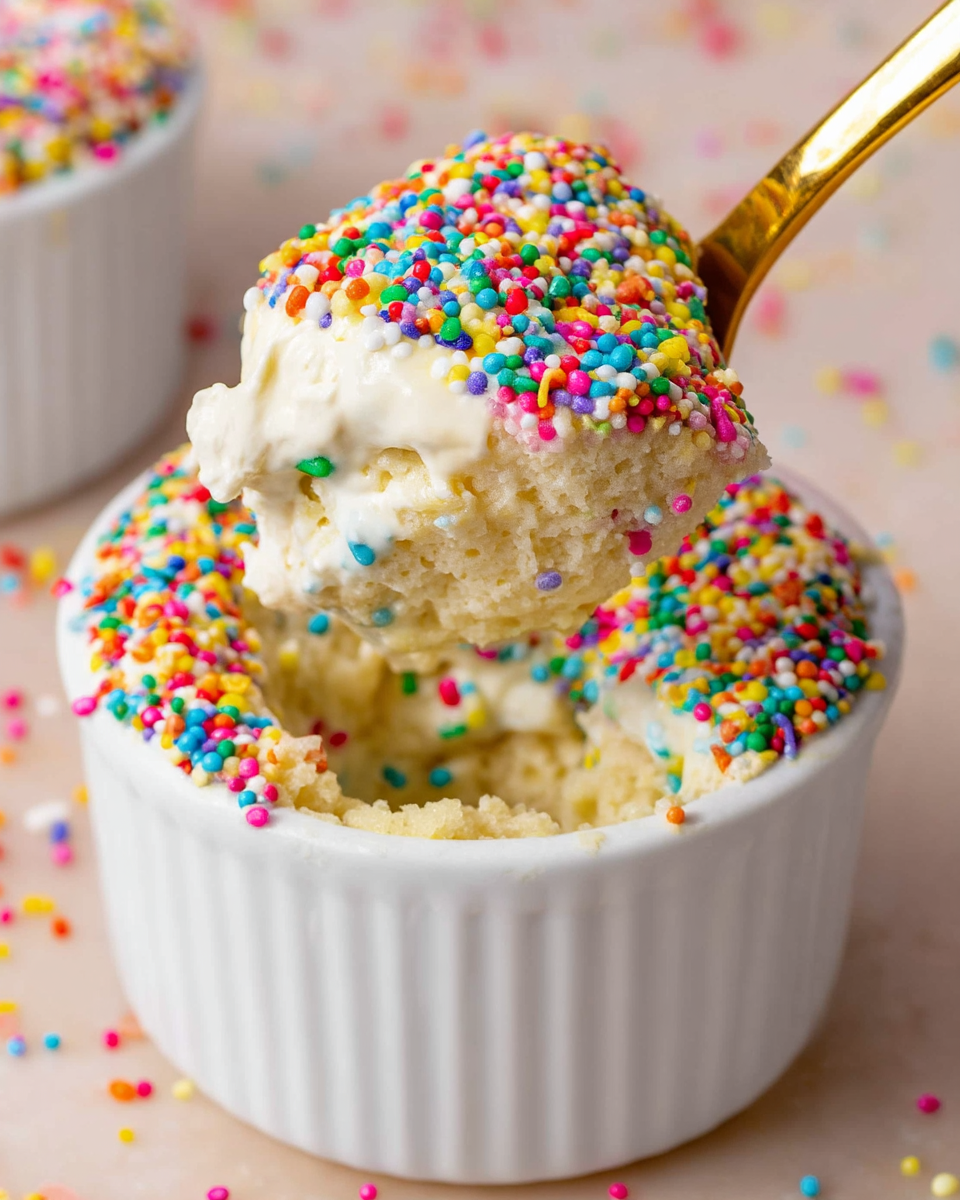
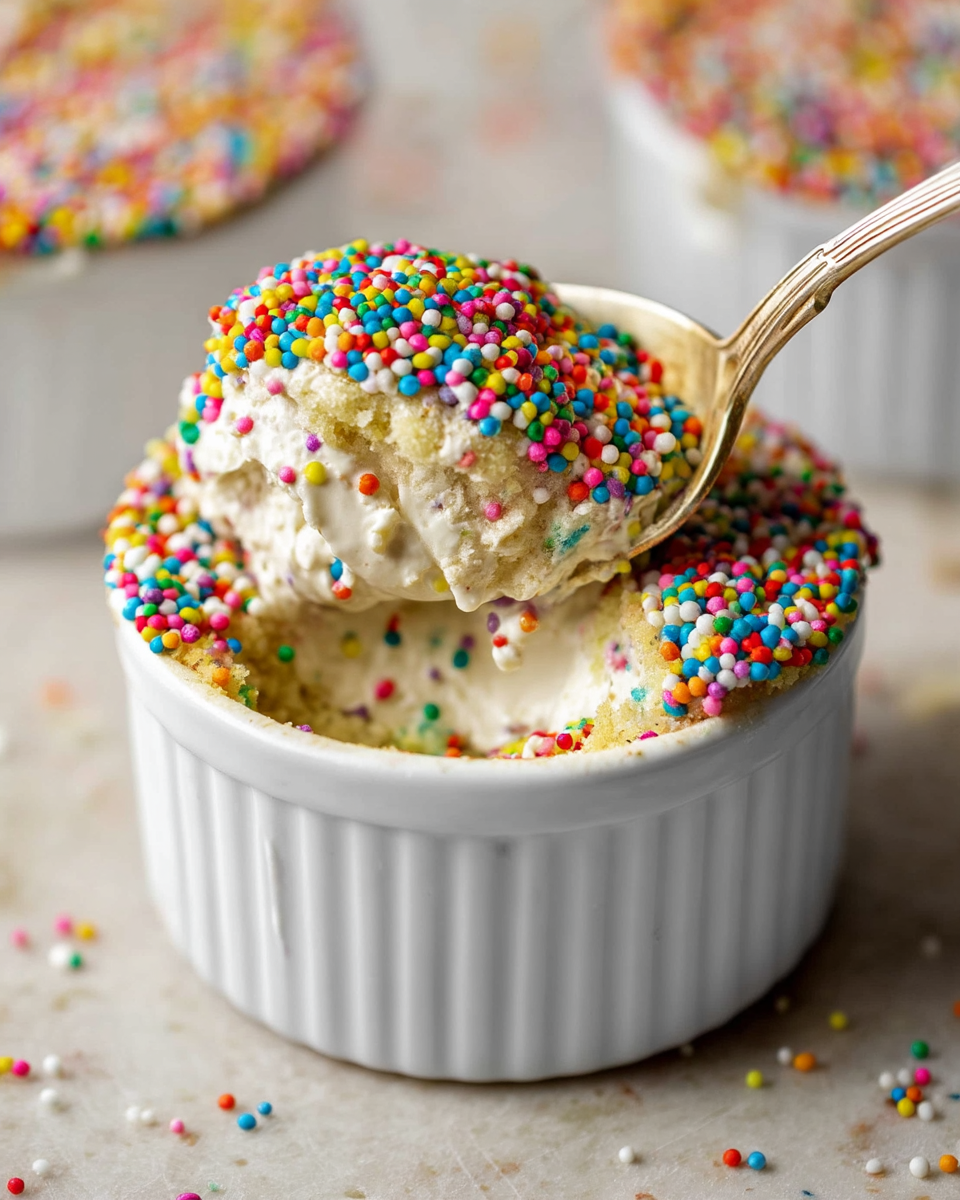
If you have spent any time on TikTok or Instagram lately, you have almost certainly stopped mid-scroll for these. A small glass cup or ramekin, a perfect dome of soft vanilla cake, a cloud of fluffy buttercream — and then that iconic coat of rainbow sprinkles covering every single inch of the surface. Neat, colorful, impossibly cute, and somehow looking like it came straight out of a high-end New York bakery. That is the Viral Dot Cake. And the internet has completely lost its mind over them.
Here is the thing though — they are one of the easiest desserts you will ever make. No stacking layers. No piping skills. No decorating experience required. Just a sheet pan cake, a round cutter, a jar, some buttercream, and a generous handful of rainbow sprinkles. The result looks like you spent hours. You did not.
Why You’ll Love This Recipe
These little cakes are everything at once — nostalgic, adorable, delicious, and wildly fun to make. They taste like the best birthday cake you ever had as a kid, but served in the most charming individual portions that feel special and intentional in a way a slice of sheet cake never quite does. The soft, moist vanilla sponge paired with that fluffy buttercream and the satisfying crunch of the sprinkle coating is a combination that works on every level.
They are also endlessly customizable — change the cake flavor, the frosting, the sprinkle colors — and you have a different dessert for every occasion. Use red, white, and blue for the Fourth of July. Orange and black for Halloween. Pastel shades for Easter. Custom colors for birthdays and baby showers. The possibilities are genuinely endless.
And because each cake is assembled in its own individual cup, they travel beautifully, store easily, and serve themselves. No cutting, no plating, no mess at the table.
What Is a Viral Dot Cake?
The trend recently exploded on TikTok and Instagram thanks to The Dotcakes, a bakery in Roslyn, New York, whose colorful sprinkle-covered “Dotcups” quickly went viral across social media. Soon after, videos featuring the cakes started generating millions of views, with people lining up across New York to get their hands on them.
A dot cake is a single-layer vanilla or confetti cake baked in a sheet pan, cut into circles using a round cutter or the rim of a ramekin, then placed inside a small glass jar or ramekin. The top is finished with a smooth layer of buttercream frosting and the whole thing is turned face-down into a plate of nonpareil sprinkles, which stick to the frosting in a dense, uniform dot pattern.
The reveal moment — lifting the jar to show a perfect dome of colored sprinkles — is what makes these cakes so irresistible on video. Many people argue that dot cakes are simply a modern viral version of old-school sprinkle cakes or bakery birthday cakes that have existed for years. The internet, however, seems happy to rediscover them all over again.
What Makes This Recipe Work
- Sour cream in the batter — it keeps the cake incredibly moist and tender, and adds just enough tang to balance the sweetness of the buttercream and sprinkles. This is the ingredient that separates a dry, forgettable sheet cake from a soft, bakery-worthy one.
- The round cutter technique — cutting the cake into neat circles and placing them cut-side down into the cups gives a clean, professional edge and a beautifully domed top every single time.
- Smooth, stiff buttercream — the buttercream needs to be thick enough to hold the sprinkles firmly and create that perfectly even, smooth surface. Too loose and the sprinkles slide. Too stiff and it tears the cake. The right consistency is everything.
- Nonpareil sprinkles — these tiny, perfectly round sprinkles are what create that signature uniform dot pattern that defines the look. Regular jimmies or confetti sprinkles will not give you the same iconic finish. Nonpareils are non-negotiable.
- The face-down flip — pressing the frosted cake face-down into a plate of sprinkles is the single most satisfying step in the whole process. It ensures every millimeter of the frosted surface is evenly coated in one smooth motion.
Ingredients
For the Vanilla Sheet Cake
- 1 box (15.25 oz) white or vanilla cake mix
- 3 large eggs
- ½ cup vegetable oil
- ½ cup water
- ½ cup sour cream
- 2 tsp pure vanilla extract
For the Vanilla Buttercream
- 1 cup (225g) unsalted butter, softened to room temperature
- 3 to 3 ½ cups (360–420g) powdered sugar, sifted
- 2 to 3 tbsp heavy cream or whole milk
- 2 tsp pure vanilla extract
- A pinch of fine salt
For Assembly
- 1 ½ to 2 cups rainbow nonpareil sprinkles
- 6 to 8 small glass jars, ramekins, or clear plastic cups (approximately 3-inch diameter)
Instructions
Step 1 — Bake the Sheet Cake
Preheat your oven to 325°F (165°C). Generously grease a 9×13-inch baking pan with nonstick spray and set aside.
In a large bowl, combine the cake mix, eggs, vegetable oil, water, sour cream, and vanilla extract. Mix until smooth and fully combined — about 2 minutes by hand or 1 minute with an electric mixer. Do not overmix.
Pour the batter into the prepared pan, spread it into an even layer, and bake for 30 to 35 minutes until a toothpick inserted into the center comes out clean and the top is lightly golden. Allow the cake to cool completely in the pan on a wire rack before cutting. Do not rush this — cutting a warm cake will cause it to crumble.
Step 2 — Make the Vanilla Buttercream
In a large bowl, beat the softened butter with an electric mixer on medium-high speed for 3 to 4 minutes until pale, fluffy, and noticeably lighter in color. This step is important — properly beaten butter creates a buttercream that is light and airy rather than dense and greasy.
Reduce the speed to low and gradually add the sifted powdered sugar, one cup at a time, mixing well after each addition. Add the vanilla extract, salt, and heavy cream one tablespoon at a time until the buttercream reaches a thick, spreadable consistency that holds its shape firmly when you pull the spatula away.
The buttercream should be stiff enough to coat the cake cleanly and hold the sprinkles without sliding — but still smooth enough to spread easily. If it is too stiff, add a few more drops of cream. If too loose, add a little more powdered sugar.
Step 3 — Cut the Cake Circles
Once the cake is completely cool, use the rim of one of your jars or ramekins as a cutter — or use a 3-inch round cookie cutter — to cut as many circles as possible from the sheet cake. Press straight down and lift cleanly. You should get 6 to 8 circles from one 9×13 pan depending on the size of your cutter. Re-cutting scraps is possible but the edges may be less clean.
Step 4 — Place the Cake in the Cups
Place one cake circle into the bottom of each jar or ramekin, cut-side down. It should sit snugly against the bottom with a slight dome rising above the rim of the cup. If the circle sits too low, cut a second thin layer of cake and stack it on top to build up the height — the dome should sit about ½ inch above the rim of the cup.
Step 5 — Frost the Top
Using an offset spatula or the back of a spoon, spread a generous, smooth, even layer of buttercream over the top of each cake dome. The frosting should cover the entire surface completely and be thick enough to hold sprinkles — about ¼ inch thick. Smooth it as evenly as possible for the cleanest sprinkle coat.
Pro Tip: If the buttercream is tearing the cake surface as you spread, chill the cakes in the refrigerator for 10 minutes first. A slightly chilled cake holds up much better under the spatula.
Step 6 — The Sprinkle Coat — The Fun Part
Pour the rainbow nonpareil sprinkles into a wide, shallow bowl or plate in a generous, even layer — about an inch deep. You want plenty of sprinkles to work with.
Pick up each cup and press the frosted top firmly but gently face-down into the sprinkles. Hold it there for 3 to 5 seconds and press lightly so the sprinkles embed into the buttercream. Lift straight up and rotate the cup slightly to check for any bare patches — press those areas into the sprinkles again until the entire surface is completely and evenly covered in a solid coat of colorful dots.
Set the finished dot cakes upright and admire your work. They are genuinely as satisfying to make as they look.
Step 7 — Serve or Chill
The dot cakes can be served immediately at room temperature, or covered and refrigerated for up to 3 days. They are delicious both ways — the cake is moist and flavorful right away, and the buttercream firms up beautifully in the fridge for a slightly denser, chewier bite that many people prefer.
To eat, simply take a spoon and dig straight down through the sprinkles, the buttercream, and the soft cake all in one scoop. That combination of crunchy sprinkles, creamy frosting, and soft sponge in every bite is exactly what all the fuss is about.
Recipe Notes
- Cool the cake completely before cutting. A warm cake crumbles under the cutter and the edges will be messy and uneven. Full room temperature cooling — or even a 30-minute chill in the refrigerator — gives you clean, sharp-edged circles.
- Nonpareils are non-negotiable for the look. The tiny, round, uniform nonpareil sprinkles are what create that signature dense dot pattern. Jimmies, confetti sprinkles, or large sequins will not give you the same result — they are too big, too irregular, and too sparse.
- Press firmly when dipping. A light press will leave gaps in the sprinkle coating. Press the frosted top into the sprinkles firmly and hold for a few seconds so they truly embed into the buttercream.
- Use enough buttercream. A thin layer of frosting will not hold the sprinkles properly and will look bare and patchy. Be generous — a thick, even layer is what creates that clean, full-coverage finish.
- The jar size matters. A 3-inch diameter jar or ramekin is the sweet spot. Too small and the cake portion is too tiny. Too large and the dome does not rise above the rim in the right way.
- Make extra sprinkles available. You will use more than you think. Having 2 full cups ready prevents you from running out halfway through and having to make do with a sparse coat on the last few cakes.
- Get the kids involved. The sprinkle-dipping step is genuinely fun for children of all ages — and adults too, if we are being honest. This is a great recipe to make together.
Variations
Chocolate Dot Cake — Use a chocolate cake mix and chocolate buttercream for a rich, indulgent version. Top with chocolate nonpareils or a mix of dark and light sprinkles for a dramatic, stunning look.
Funfetti Dot Cake — Use a funfetti or confetti cake mix for a cake that already has sprinkles baked right inside. Pair with vanilla buttercream and coat with rainbow nonpareils for a double sprinkle experience that is pure joy.
Strawberry Dot Cake — Use a strawberry cake mix and strawberry buttercream, and coat with pink and red nonpareils. Perfect for Valentine’s Day, baby girl showers, or birthdays.
Lemon Dot Cake — Add 2 teaspoons of lemon zest and 1 tablespoon of fresh lemon juice to a vanilla cake batter, and pair with lemon buttercream for a bright, citrusy version that is refreshing and unexpected.
Cream Cheese Frosting Version — Swap the vanilla buttercream for a tangy cream cheese frosting. The slight tartness of the cream cheese against the sweet sprinkle coating is an incredible flavor combination.
Holiday Themed Dot Cakes — Stick with a classic vanilla base and simply change the sprinkle colors to suit the occasion — orange and black for Halloween, red and green for Christmas, pastel rainbow for Easter, patriotic red, white, and blue for the Fourth of July.
Make-Ahead Tips
These dot cakes are ideal for preparing in advance:
- Bake the cake up to 2 days ahead. Wrap the cooled sheet cake tightly in plastic wrap and store at room temperature. Cut the circles when ready to assemble.
- Make the buttercream up to 3 days ahead. Store in an airtight container in the refrigerator. Bring to room temperature and beat briefly before using.
- Assemble up to 24 hours ahead. Once assembled and sprinkle-coated, cover each cup loosely with plastic wrap and refrigerate. The sprinkles hold beautifully overnight.
Storage
Room temperature: Assembled dot cakes can sit at room temperature for up to 4 hours — perfect for a party table or dessert display.
Refrigerator: Cover loosely and refrigerate for up to 3 days. The cake stays moist and the buttercream firms up slightly — many people actually prefer the texture after a night in the fridge.
Freezer: Freeze the unfrosted cake circles for up to 2 months, tightly wrapped. Thaw at room temperature before frosting and coating with sprinkles.
Did you make this Viral Dot Cake? We want to see it! Leave a comment below and tag us on social media — these are too cute not to share.
