I still remember the warm, comforting aroma of my grandmother’s homemade cherry cobbler. It filled our home on summer afternoons. This memory has stayed with me, and I’m excited to share my easy version with you.
Making this old-fashioned cherry cobbler is easy. It needs just a few simple ingredients and little prep. The result is a tender fruit filling and a crispy, golden-brown crust. It’s sure to become a family favorite.
Key Takeaways
- Easy-to-follow instructions for a classic dessert
- Simple ingredients and minimal preparation required
- A deliciously tender fruit filling topped with a crispy crust
- Perfect for warm weather gatherings and family events
- A great way to enjoy the flavors of summer
The Sweet Nostalgia of Homemade Cherry Cobbler
Homemade cherry cobbler is more than a dessert. It’s a trip back to simpler times and family traditions. For me, it brings back warm memories of family gatherings and home-cooked meals.
My Family’s Cherry Dessert Tradition
Growing up, my family baked a homemade cherry cobbler for special occasions. It was more than a dessert; it was a symbol of love and togetherness. My grandmother spent hours in the kitchen, preparing the filling and biscuit topping with care.
Making this old-fashioned dessert was a family affair. Everyone helped, bonding and creating memories that lasted a lifetime.
Why You’ll Love This Recipe
This cherry dessert recipe is simple and flavorful. The tender cherries and crumbly biscuit topping are perfect together. Plus, it’s easy to make with just a few ingredients you might already have.
Whether you want to recreate family history or start a new tradition, this homemade cherry cobbler will be a hit. It’s great for any occasion, from casual dinners to formal gatherings.
What Makes an Old-Fashioned Cherry Cobbler So Special
A warm, freshly baked old-fashioned cherry cobbler feels like a cozy afternoon with loved ones. It’s a classic dessert loved by many for generations. Its lasting appeal comes from a few key reasons.
The Difference Between Cobblers, Crisps, and Crumbles
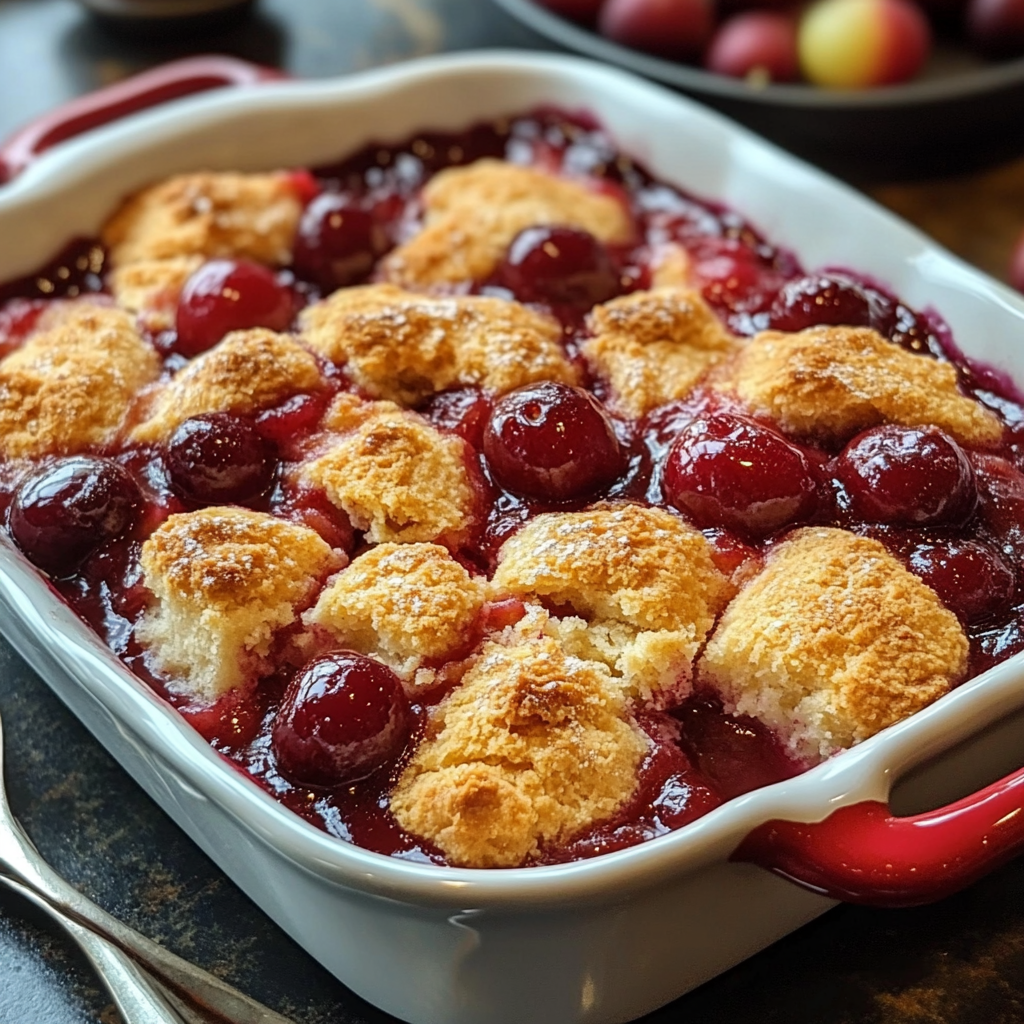
Old-fashioned cherry cobbler stands out because of its unique topping. Unlike crisps and crumbles, which have an oat and nut topping, cobbler has a biscuit-like topping. This makes the dessert’s texture and taste special.
The cobbler topping, made with flour, sugar, and butter, contrasts well with the fruit. This contrast is what makes a cobbler so enjoyable to eat.
The Perfect Balance of Sweet and Tart Flavors
Getting the sweet and tart flavors just right is key to a great cobbler. The filling, with cherries, sugar, and almond extract, should be tasty but not too sweet. The tart cherries balance the richness of the topping.
Using both sweet and tart cherries adds depth to the flavor. A bit of lemon juice or zest can also boost the tartness. This makes the dessert more interesting.
Knowing these tips helps you make a cobbler that’s not just tasty but also full of tradition and warmth. It’s perfect for sharing with family and friends.
Gathering Your Cherry Cobbler Ingredients
Getting the right ingredients is key for a tasty cherry cobbler. I’ll help you pick the best ones. The quality of your ingredients affects the taste and texture of your dessert.
Choosing the right cherries is crucial for a cherry cobbler recipe. Let’s look at your options.
Cherry Options: Fresh, Frozen, or Canned
Choosing between fresh, frozen, or canned cherries depends on the season and what you like. Fresh cherries are sweet-tart when in season. Frozen cherries are tasty all year and save you from pitting. Canned cherries are convenient but softer and sweeter.
Make sure to drain canned or thaw frozen cherries well. This avoids extra liquid in your cobbler.
The Biscuit Topping Ingredients
The biscuit topping is key for a cherry dessert. It contrasts with the soft cherries. You’ll need flour, sugar, baking powder, and salt. Cold butter and milk or buttermilk are important for flaky texture and moisture. An egg enriches the dough and helps it brown.
Use top-quality ingredients for the best results. Keep your butter and milk cold.
Optional Add-ins for Flavor Variations
Customizing your cobbler topping is fun. Try adding cinnamon or nutmeg for extra flavor. Chopped nuts or chocolate chips can also add a twist.
Trying different add-ins makes your recipe unique. It keeps baking exciting.
Essential Kitchen Tools for Perfect Results
To get perfect results with your homemade cherry cobbler, you need the right tools. The quality of your baking gear can really change how your old-fashioned dessert turns out.
Choosing the Right Baking Dish
Choosing the right baking dish is key for your baking cherry cobbler. A 9×9-inch square dish or a round dish of similar size is best. Ceramic or glass dishes are good because they heat evenly.
Helpful Utensils and Equipment
Along with the right dish, you’ll need the right tools for your homemade cherry cobbler. You’ll need a mixing bowl, measuring cups, and a pastry blender or fork for the topping. A spoon or spatula is great for putting the cobbler together. A kitchen scale helps with exact measurements.
With these essential tools, you’re ready to make a tasty old-fashioned dessert that everyone will love.
Step-by-Step Old-Fashioned Cherry Cobbler Preparation
To make a tasty old-fashioned cherry cobbler, just follow these easy steps. First, prepare the cherry filling. Then, mix the cobbler topping. Finally, put everything together.
Preparing the Cherry Filling
The cherry filling is the cobbler’s heart. It’s key to get it right. You can use fresh, frozen, or canned cherries, based on what’s in season and what you like.
Pitting and Preparing Fresh Cherries
For fresh cherries, start by pitting them. You can use a cherry pitter or cut around the pit. Fresh cherries add a lively flavor and texture that’s hard to beat.
Adjusting Sweetness and Thickening
Adjust the sugar in the filling based on the cherries’ sweetness. Also, add a thickening agent like cornstarch for the right consistency. Getting the sweetness and thickness just right is crucial.
Mixing the Perfect Cobbler Topping
The cobbler topping should be crumbly and buttery. This contrasts well with the soft cherry filling. Mix flour, sugar, and cold butter until it’s like coarse crumbs. The topping’s quality is vital, so make sure it’s good.
Assembly Instructions
To put the cobbler together, spread the cherry filling in a baking dish. Then, cover it with the cobbler topping evenly. Make sure to cover the filling fully for the best taste. Now, bake it until it’s golden.
Baking Your Cherry Cobbler to Golden Perfection
Baking turns your old-fashioned cherry cobbler into a golden delight. This step needs careful attention for the perfect flavors and textures.
Oven Temperature and Rack Positioning
Preheat your oven to 375°F (190°C). Position the rack in the lower third of the oven. This helps bake evenly and prevents the topping from burning too fast.
Visual Cues for Doneness
Doneness isn’t just about time; it’s also about how it looks. Your cobbler is ready when the biscuit topping is golden brown and the filling bubbles. It usually takes 40-45 minutes. Watch it closely in the last 10 minutes to avoid burning.
The Important Cooling Process
It’s hard to wait, but cooling your cherry cobbler is key. Let it cool for at least 30 minutes before serving. This step lets the filling thicken and the flavors blend, making it taste even better.
By following these tips, you’ll get a perfectly baked cherry cobbler. It’s perfect for family gatherings or a cozy evening. Your old-fashioned cherry cobbler will surely be a hit.
Delicious Ways to Serve Your Cherry Cobbler
Cherry cobbler is a versatile dessert. It can be served in many ways. The key is to match its flavor and texture.
Classic Pairings: Ice Cream and Whipped Cream
A warm slice of cherry cobbler with cold ice cream is perfect. The warm cobbler and cool ice cream mix well. Vanilla ice cream is a classic choice, but try cinnamon or caramel for something different.
Whipped cream is also a great choice. It’s light and sweet, perfect with the rich cobbler.
Creative Serving Ideas for Special Occasions
For special occasions, make your cherry cobbler stand out. Serve it in individual ramekins for a personal touch. Add powdered sugar or fresh cherries for extra flair.
You can also pair it with other desserts like cheesecake or fruit salad. For a richer treat, drizzle it with caramel or chocolate syrup.
Trying different ways to serve your cherry cobbler makes it a hit at any event. It’s perfect for family dinners or formal gatherings.
Storing and Reheating Your Cherry Cobbler
Now that you’ve made your old-fashioned cherry cobbler, let’s talk about storing and reheating. These steps are key to keeping your dessert fresh and tasty. They help you enjoy your cherry dessert for longer.
Keeping It Fresh: Refrigeration Tips
To keep your cobbler fresh, store it in the fridge within two hours of baking. Use plastic wrap or foil, or an airtight container. This way, your cobbler stays good for up to three days. Don’t forget to label it with the date.
Freezing Instructions for Later Enjoyment
If you won’t eat your cobbler in a few days, freeze it. Cool it down first, then wrap it tightly. You can also freeze it in portions for easy reheating. Frozen cobbler lasts up to three months. To thaw, leave it in the fridge overnight or at room temperature for a few hours.
The Best Ways to Reheat Without Sogginess
To reheat your cobbler without a soggy topping, use the oven. Set your oven to 35
0°F (175°C). Place the cobbler on a baking sheet, covered with foil. Heat for 20-25 minutes for a whole cobbler, or 10-15 minutes for individual servings. The microwave can also work, but be careful not to make the crust soggy. Use a low power setting and check it often.
Cherry Cobbler Bliss: Why This Dessert Never Disappoints
My old-fashioned cherry cobbler recipe has been a family favorite for years. It’s loved by all because of its tender cherries, sweet biscuit topping, and hint of cinnamon. This mix makes for a dessert that’s unforgettable.
This homemade cherry cobbler is simple to make. You only need a few ingredients and easy steps. It’s perfect for any gathering or special event. It’s sure to impress everyone.
You can enjoy this cobbler warm with ice cream or whipped cream. Or, have it at room temperature with whipped cream. Either way, it’s a treat that will satisfy your sweet tooth and leave you craving more.
This cobbler has the perfect mix of sweet and tart. It’s a dessert that always hits the spot. I suggest adding it to your dessert collection. It will bring joy to your family and friends.
Ingredients
Method
- Prep & Preheat
- Preheat oven to 375°F (190°C). Grease an 8x8-inch baking dish or similar-sized casserole dish.
- Make the Cherry Filling
- In a large bowl, gently toss cherries with sugar, cornstarch, vanilla, and optional lemon zest or almond extract until evenly coated.
- Spread the mixture into the prepared dish in an even layer.
- Prepare the Topping
- In a medium bowl, whisk together flour, sugar, baking powder, and salt.
- Stir in melted butter and milk until just combined—the batter should be thick like cookie dough.
- Assemble & Bake
- Drop spoonfuls of topping over the cherries, spreading lightly (gaps are fine—it expands while baking).
- Optional: Sprinkle with cinnamon or coarse sugar for extra flavor and texture.
- Bake for 35–45 minutes, until the filling bubbles and the topping is golden. Tip: Cover loosely with foil if the top browns too quickly.
- Serve Warm
- Let cool for 10–15 minutes to allow the filling to set.
- Serve with a scoop of vanilla ice cream or whipped cream for the ultimate indulgence.
Notes