Bumpy Cake
Prep Time: 30 minutes | Bake Time: 33 minutes | Assembly Time: 20 minutes | Chill Time: 30 minutes | Serves: 12–16
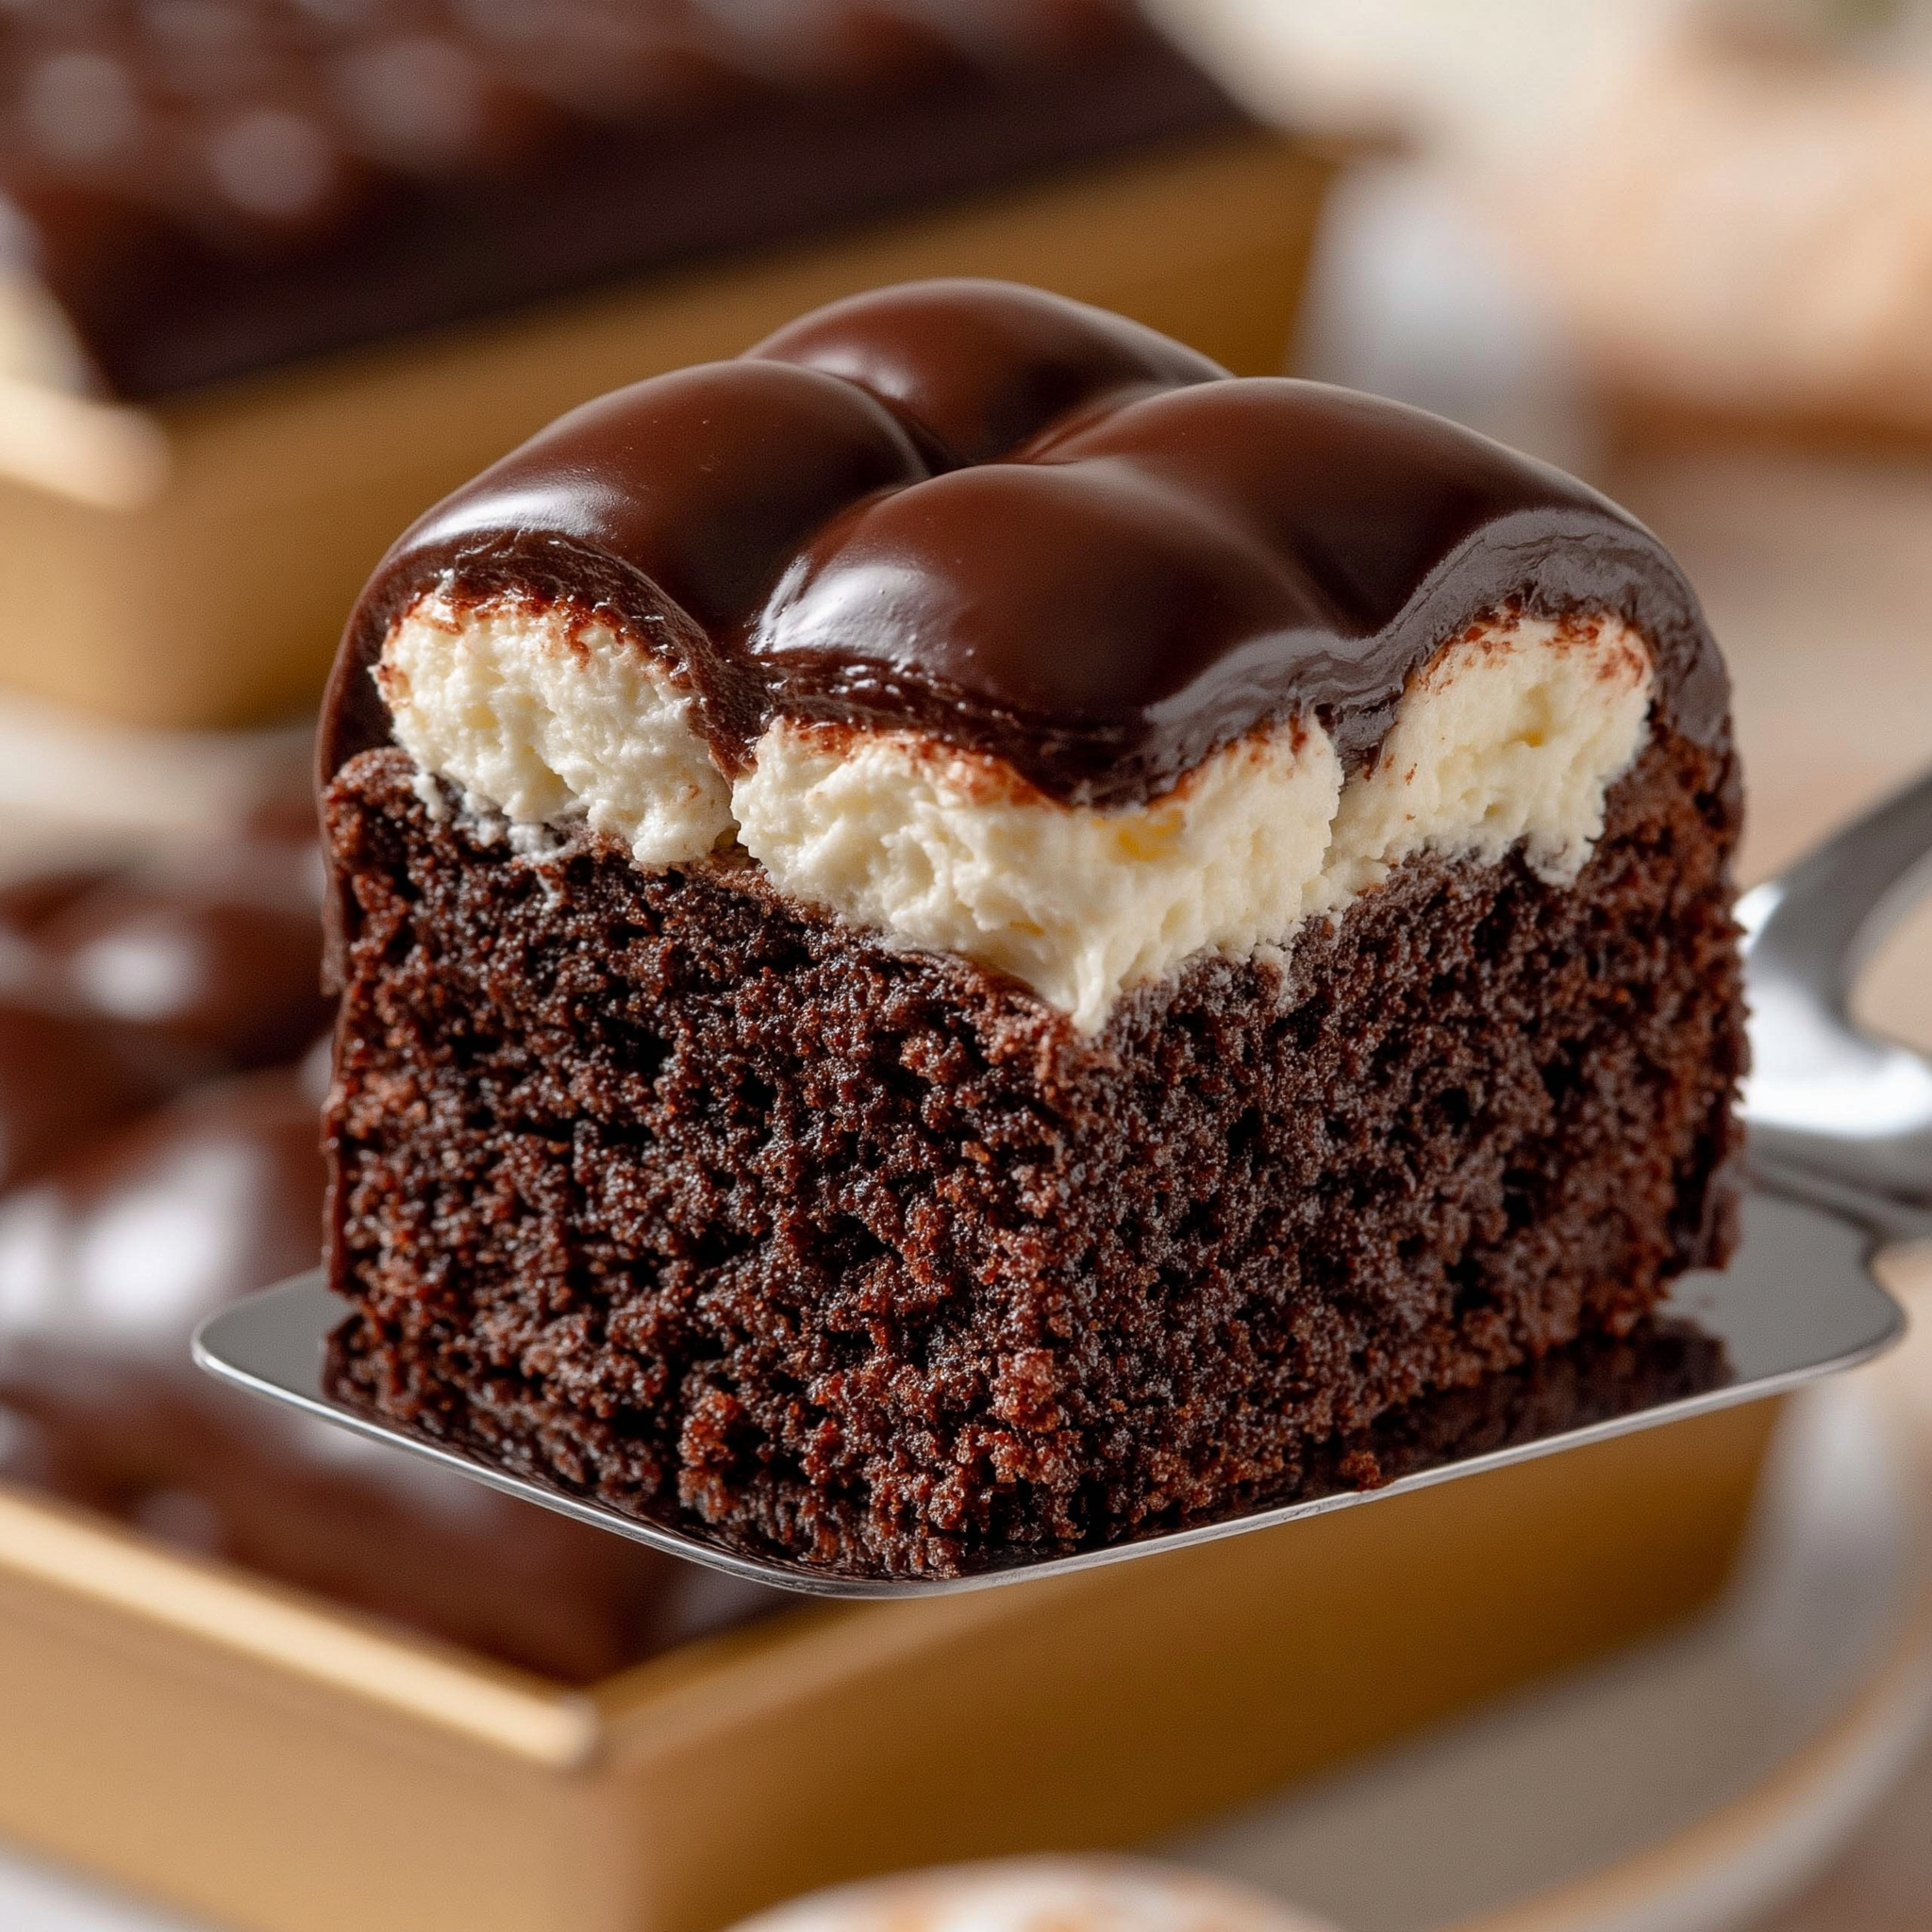
If you have never heard of Bumpy Cake, you are about to fall head over heels for one of America’s most iconic and underrated regional desserts. A deeply rich, moist devil’s food chocolate cake, topped with thick piped ribbons of fluffy vanilla buttercream, and then completely draped in a glossy, poured chocolate fudge frosting that sets over every single bump and valley like a dream. The result looks like nothing else in the dessert world — dramatic, beautiful, and completely unforgettable.
This is a Detroit classic. A Michigan legend. And once you make it, you will completely understand why people who grew up eating Sanders Bumpy Cake become lifelong devotees who cannot imagine a birthday, holiday, or celebration without it.
Why You’ll Love This Recipe
Three layers of pure dessert magic — moist chocolate cake, silky vanilla buttercream, and rich chocolate fudge frosting — all working together in perfect harmony. Every single bite gives you all three at once, and the combination is one of those rare things that is genuinely greater than the sum of its parts. The vanilla buttercream cuts through the deep chocolate with just the right amount of sweetness, and the fudge frosting ties everything together into one of the most satisfying bites of cake you will ever experience.
It also looks absolutely stunning. Those distinctive bumps peeking through the glossy chocolate coating are what make this cake so instantly recognizable and so wildly impressive on a dessert table — and yet the technique to create them is far simpler than it looks. If you can pipe a straight line and pour a ganache, you can make a Bumpy Cake that looks like it came straight from a Detroit bakery.
The Story Behind the Bumps — A Detroit Legend
<cite index=”117-1″>To track down the history of Bumpy Cake, we need to travel to the original Sanders chocolate shop in Detroit, Michigan. The famous Bumpy Cake was born here when founder Fred Sanders created this iconic-looking cake in 1913. Originally known as “The Sanders Devil’s Food Buttercream Cake,” the name evolved over the years thanks to loyal customers who lovingly called it “the cake with the bumps,” which caused Mr. Sanders to change the name to “Bumpy Cake.”</cite>
<cite index=”116-1”>The iconic “Bumpy Cake” is a Motor City classic that has its roots in a Detroit chocolate shop that opened in 1875.</cite> More than a century later, it remains one of the most beloved regional cakes in the entire country — a true piece of American baking heritage that deserves to be known far beyond the borders of Michigan.
<cite index=”117-1″>Today, Sanders sells four different varieties of Bumpy Cake. And, while they remain the sole owner of the original recipe and trademarked “Bumpy” name,</cite> this homemade version captures every bit of what makes the original so special — and lets you bring a little piece of Detroit into your own kitchen.
What Makes This Recipe Work
- Dutch-process cocoa powder — richer, darker, and less acidic than natural cocoa, Dutch-process cocoa is what gives the chocolate cake that deep, intense color and flavor that is the foundation of every great Bumpy Cake. A tablespoon of black cocoa powder stirred in takes the color even deeper.
- Hot coffee in the cake batter — coffee is the baker’s secret weapon for chocolate cake. It amplifies and deepens the cocoa flavor without making the cake taste like coffee at all. Hot water works as a substitute, but coffee is what the best versions use.
- Buttermilk in the cake — the acidity of buttermilk reacts with the leavening agents to create an incredibly tender, moist crumb that holds up beautifully under the weight of the buttercream and fudge frosting without getting compressed.
- The freeze between layers — piping the buttercream bumps and then freezing the cake for a few minutes before pouring the fudge frosting is the technique that keeps the bumps perfectly defined and prevents them from melting into the warm frosting. This is the signature step that creates the iconic Bumpy Cake look.
- The poured fudge frosting — unlike a spread-on frosting, the fudge topping is poured over the cake while warm and allowed to drape naturally over the buttercream bumps. As it sets, it creates that gorgeous, glossy, undulating surface that makes this cake so visually distinctive and completely irresistible.
Ingredients
For the Devil’s Food Cake
- 2 cups (250g) all-purpose flour
- 1 ¾ cups (350g) granulated sugar
- ¾ cup (75g) Dutch-process cocoa powder (plus 1 tbsp black cocoa for deeper color, optional)
- 2 tsp baking soda
- 1 tsp baking powder
- 1 tsp fine salt
- 2 large eggs, room temperature
- 1 cup (240ml) buttermilk, room temperature
- ½ cup (120ml) vegetable oil
- 2 tsp pure vanilla extract
- 1 cup (240ml) hot brewed coffee (or hot water)
For the Vanilla Buttercream Bumps
- 1 cup (225g) unsalted butter, softened to room temperature
- 3 cups (360g) powdered sugar, sifted
- 2 to 3 tbsp heavy cream or whole milk
- 2 tsp pure vanilla extract
- A pinch of fine salt
For the Chocolate Fudge Frosting
- 1 cup (240ml) heavy cream
- 2 tbsp unsalted butter
- 2 tbsp light corn syrup
- 2 cups (340g) semi-sweet chocolate chips or finely chopped semi-sweet chocolate
- 1 tsp pure vanilla extract
- A pinch of fine salt
Instructions
Step 1 — Bake the Devil’s Food Cake
Preheat your oven to 350°F (175°C). Grease a 9×13-inch baking pan with nonstick cooking spray and line the bottom with parchment paper, leaving an overhang on both long sides for easy removal. Set aside.
In a large bowl, whisk together the flour, sugar, cocoa powder, black cocoa (if using), baking soda, baking powder, and salt until completely combined and no lumps remain. Set aside.
In a separate large bowl or the bowl of a stand mixer, combine the eggs, buttermilk, vegetable oil, and vanilla extract. Mix on medium speed for about 1 minute until smooth and well combined. Gradually add the dry ingredients to the wet ingredients, mixing on low speed until just combined. With the mixer on low, slowly pour in the hot coffee in a thin, steady stream. The batter will be quite thin — this is completely normal and is exactly what creates that ultra-moist, tender crumb.
Pour the batter into the prepared baking pan and bake for 30 to 35 minutes, until a toothpick inserted into the center comes out clean or with just a few moist crumbs. Do not overbake — a slightly underbaked chocolate cake stays moist longer and tastes better.
Allow the cake to cool completely in the pan on a wire rack before proceeding to the next step. Do not rush this — a warm cake will melt the buttercream and everything will slide.
Step 2 — Make the Vanilla Buttercream
In a large bowl, beat the softened butter with an electric mixer on medium-high speed for 3 to 4 minutes until it is pale, fluffy, and noticeably lighter in color. Reduce the speed to low and gradually add the sifted powdered sugar, one cup at a time, mixing well after each addition. Add the vanilla extract, salt, and heavy cream one tablespoon at a time, beating until the buttercream is thick, smooth, and holds stiff peaks. It should be firm enough to hold its piped shape without slumping — if it seems too soft, add a little more powdered sugar.
Step 3 — Pipe the Buttercream Bumps
Transfer the buttercream to a piping bag fitted with a large round tip — a 1A or 2A tip is ideal. If you do not have a piping bag, a large zip-lock bag with one corner snipped off works perfectly.
Starting at one short end of the cooled cake, pipe thick, even ribbons of buttercream lengthwise across the entire surface of the cake from one end to the other, spacing each ribbon about 1 inch apart. Each ribbon should be about ½ inch thick and ½ inch tall — generous, prominent, and well-defined. These are your bumps, so do not be shy. The more defined and pronounced they are, the more dramatic and beautiful the finished cake will look.
Step 4 — Freeze the Cake
This step is the key to perfect bumps. Place the cake — still in the pan — in the freezer for 15 to 20 minutes, until the buttercream bumps are completely firm and set to the touch. This ensures that when you pour the warm fudge frosting over the top, the buttercream holds its shape perfectly rather than softening and blending into the frosting.
Step 5 — Make the Chocolate Fudge Frosting
While the cake chills, make the fudge frosting. In a small saucepan over medium heat, combine the heavy cream, butter, and corn syrup. Heat, stirring occasionally, until the mixture just begins to simmer and the butter is fully melted. Remove from heat immediately.
Add the chopped chocolate or chocolate chips all at once and let the mixture sit undisturbed for 2 minutes to allow the chocolate to melt from the residual heat. Then stir slowly and gently from the center outward until the frosting is completely smooth, glossy, and combined. Stir in the vanilla extract and a pinch of salt. Allow the frosting to cool for 5 to 8 minutes until it has thickened slightly but is still pourable — you want it liquid enough to flow over the bumps but thick enough to coat them without running off the sides of the cake entirely.
Step 6 — Pour the Fudge Frosting
Remove the cake from the freezer. Working quickly and confidently, pour the warm fudge frosting evenly over the surface of the entire cake — starting in the center and working outward toward the edges. The frosting will drape naturally over the buttercream bumps, filling in the valleys between them and creating that stunning, undulating surface that gives this cake its name. Use a spatula or the back of a spoon to gently guide the frosting to the edges if needed.
Do not spread or work the frosting excessively — pour and let gravity and the warmth do the work. The less you fuss with it, the more beautiful and glossy the finish will be.
Allow the frosting to set at room temperature for 30 minutes, or refrigerate for 15 minutes for a firmer finish.
Step 7 — Slice and Serve
Once the fudge frosting has set, the cake is ready to slice and serve. For the cleanest cuts that show off those beautiful layers, use a sharp knife and wipe the blade clean between each slice.
To serve, use the parchment overhang to lift the entire cake out of the pan and onto a cutting board, or slice directly in the pan and serve from there. Either way, every slice should show a gorgeous cross-section of dark chocolate cake, white vanilla buttercream ribbon, and glossy chocolate fudge topping — three distinct layers of pure deliciousness.
Recipe Notes
- Cool the cake completely before piping. Even slightly warm cake will melt the buttercream on contact. Full room temperature cooling — or even a 30-minute chill in the refrigerator — is essential before you pipe.
- The freeze is non-negotiable. Do not skip the 15-minute freeze after piping the buttercream bumps. It is the single step that keeps the bumps defined and beautiful under the warm fudge frosting. Without it, the bumps will soften and lose their shape.
- Pour the fudge frosting, don’t spread it. Spreading the fudge frosting will drag it across the buttercream bumps and obscure them. Pour it from the center and let it flow naturally for the most beautiful, glossy finish.
- Let the fudge frosting cool slightly before pouring. Too hot and it will melt the buttercream even through the freeze. Too cool and it will be too thick to flow. The sweet spot is warm and pourable but not steaming — test it on a spoon; it should coat the back and drip slowly.
- Dutch-process cocoa makes a difference. It produces a richer, darker, more deeply flavored chocolate cake than natural cocoa. If you can only find natural cocoa, reduce the baking soda by ¼ teaspoon to account for the difference in acidity.
- Use room temperature ingredients. Room temperature eggs and buttermilk incorporate more evenly into the batter, creating a smoother, more uniform cake crumb. Take them out of the refrigerator at least 30 minutes before you start.
- Hot coffee is the secret. Do not leave it out. The hot liquid blooms the cocoa powder and the coffee flavor disappears completely during baking — what remains is a noticeably deeper, more complex chocolate flavor that makes all the difference.
Variations
<cite index=”117-1″>While devil’s food cake with buttercream and chocolate fudge frosting is the beloved classic, feel free to get creative with your Bumpy Cake flavors.</cite> Here are some crowd-pleasing variations worth trying:
Mint Chocolate Bumpy Cake — Add ½ teaspoon of pure peppermint extract to the vanilla buttercream for a cool, refreshing mint filling that pairs beautifully with the chocolate fudge coating.
Peanut Butter Bumpy Cake — Replace the vanilla buttercream with a peanut butter buttercream made by beating ½ cup of creamy peanut butter into the base butter before adding the powdered sugar. Chocolate and peanut butter in Bumpy Cake form is absolutely extraordinary.
Salted Caramel Bumpy Cake — Swap the vanilla buttercream for a salted caramel buttercream and use a caramel fudge drizzle instead of the chocolate frosting. Rich, decadent, and uniquely beautiful.
German Chocolate Bumpy Cake — Replace the vanilla buttercream with the classic coconut-pecan frosting used in German Chocolate Cake. The texture and flavor contrast under the chocolate fudge coating is stunning.
Mocha Bumpy Cake — Add 1 tablespoon of instant espresso powder to the vanilla buttercream for a coffee-flavored filling that deepens the chocolate experience even further.
White Chocolate Fudge Topping — Replace the semi-sweet chocolate in the fudge frosting with high-quality white chocolate for a stunning visual contrast against the dark chocolate cake and white buttercream bumps.
Make-Ahead Tips
Bumpy Cake is an excellent make-ahead dessert and actually benefits from a little resting time:
- Bake the cake up to 2 days ahead. Wrap the fully cooled, unfrosted cake tightly in plastic wrap and store at room temperature or in the refrigerator.
- Make the buttercream up to 3 days ahead. Store in an airtight container in the refrigerator. Bring to room temperature and beat briefly before piping.
- Assemble the full cake up to 24 hours ahead. Once the fudge frosting has set, cover loosely and refrigerate. The flavors meld beautifully overnight and the cake tastes even better the next day.
What to Serve Alongside
Bumpy Cake needs no accompaniment — it is a star on its own. But if you are building out a full dessert table:
- A scoop of vanilla bean ice cream on the side turns a slice of Bumpy Cake into an over-the-top dessert experience
- Fresh raspberries or strawberries on the plate add a tart, fruity brightness that cuts through the richness beautifully
- A cold glass of whole milk is, frankly, the most classic and most correct pairing
- Strong black coffee or a dark roast espresso for the adults at the table
Storage
Room temperature: Cover loosely with plastic wrap or a cake dome and store at room temperature for up to 2 days.
Refrigerator: Store covered in the refrigerator for up to 5 days. Allow slices to come to room temperature for 15 to 20 minutes before serving — the buttercream and fudge frosting are at their best slightly above refrigerator temperature.
Freezer: <cite index=”118-1″>This cake also freezes well. Double wrap it and store for up to 8 weeks.</cite> Thaw overnight in the refrigerator and bring to room temperature before serving. Individual slices can also be wrapped and frozen separately for an easy, anytime treat.
Did you make this Bumpy Cake? Leave a comment below and let us know how it turned out — and don’t forget to tag us on social media! We love seeing your beautiful bumps.
