No-Bake Crunch Bars: A Satisfying Homemade Delight
Welcome to the world of delicious homemade desserts. No-bake recipes make it easy to create sweet treats without baking skills. No-bake crunch bars are a perfect example of easy kitchen projects that can be customized to suit any taste.
These no-bake crunch bars are a great project to undertake. They require minimal equipment and no baking skills. This makes them an ideal homemade dessert for anyone looking to try their hand at easy kitchen projects.

No-bake recipes like these crunch bars are perfect for those who want to make homemade desserts without the hassle of baking. With simple ingredients and easy-to-follow instructions, you can create delicious no-bake crunch bars in no time.
Introduction to No-Bake Crunch Bars
No-bake crunch bars are a type of homemade dessert that is easy to make and fun to customize. They are a great example of no-bake recipes that can be made with minimal equipment and no baking skills.
Key Takeaways
- No-bake crunch bars are a type of homemade dessert that is easy to make
- No-bake recipes like these crunch bars require minimal equipment
- These crunch bars are a great example of easy kitchen projects
- No-bake crunch bars can be customized to suit any taste
- Homemade desserts like these crunch bars are perfect for those who want to try their hand at baking without the hassle
- No-bake recipes are a great way to make delicious desserts without any baking skills
What Makes No-Bake Crunch Bars Special
No-bake desserts are loved for their simplicity and quickness. No-bake crunch bars are especially popular because they’re easy to make. They’re perfect for quick desserts that you can whip up fast.
No-bake desserts are great because you can make them your own. They’re perfect for both beginners and experienced bakers. You can try out different flavors and textures to make unique treats for any event.
Some of the benefits of no-bake crunch bars include:
- Easy to make: No-bake crunch bars need just a few ingredients and can be ready in minutes.
- Customizable: You can add your favorite nuts, seeds, or chocolate chips to make a special flavor.
- Perfect for hot summer days: No-bake crunch bars are ideal for hot days when you don’t want to heat up your kitchen.
No-bake crunch bars are ideal for anyone who wants a quick dessert with little effort. They’re great for desserts for all skill levels and can be tailored to any taste. Their ease and versatility make them a favorite among dessert fans.
Essential Ingredients for Perfect Crunch Bars
To make perfect no-bake crunch bars, you need the right ingredients. The quality of crunch bar ingredients greatly affects taste and texture. Fresh nuts like almonds or walnuts add crunch, while top-notch chocolate boosts flavor.
When picking no-bake dessert ingredients, think about dietary needs. For example, gluten-free cereals or vegan chocolate can make your bars more accessible. Here are some must-haves:
- Nuts: almonds, walnuts, or pecans
- Binding ingredients: peanut butter, chocolate, or nutella
- Sweeteners: honey, sugar, or maple syrup
- Crunchy elements: cereal, oats, or coconut flakes
Using homemade dessert ingredients lets you control quality and amounts. You can also tailor your crunch bars to your liking. Choose fresh, high-quality ingredients for the best taste and texture.
By picking the right ingredients, you can make tasty no-bake crunch bars. They’re great for snacks or desserts. Try different ingredients and flavors to find your favorite.
| Ingredient | Quantity | Optional |
|---|---|---|
| Nuts | 1 cup | Gluten-free |
| Binding ingredients | 1/2 cup | Vegan chocolate |
| Sweeteners | 1/4 cup | Maple syrup |
Kitchen Tools You’ll Need
To make no-bake crunch bars, you’ll need some key kitchen tools. The right tools make the process easier and faster. You’ll need a mixing bowl, a spoon or spatula, and a pan or tray.
There are also optional tools that can improve your dessert. A food processor helps grind nuts, and a double boiler melts chocolate well. With these tools, your dessert will look and taste great.
Basic Equipment List
- Mixing bowl
- Spoon or spatula
- Pan or tray
Optional Tools for Enhanced Results
- Food processor
- Double boiler
Choosing the right tools for no-bake desserts is crucial. They ensure your crunch bars are delicious and look professional. Investing in these tools makes creating a great dessert easy.
How to Make No-Bake Crunch Bars
Making no-bake crunch bars is easy and fun. You need just a few tools and ingredients. First, grind nuts or cereal for crunch. Then, melt chocolate or peanut butter to bind everything together.
No-bake dessert recipes are all about being easy and quick. That’s why no-bake crunch bars are great. With simple ingredients and a bit of prep, you can make a tasty treat for any time.
Preparation Steps
- Grind nuts or cereal for the crunchy texture
- Melt binding ingredients like chocolate or peanut butter
- Combine ingredients in a large bowl
Mixing Instructions
Follow the mixing steps carefully for the right mix. Mix the ground nuts or cereal with the melted ingredients until they’re well combined. You can also add dried fruit or coconut flakes for extra flavor and texture.
Setting and Cooling Process
The setting and cooling steps are key for no-bake crunch bars. Press the mix into a pan and let it cool and set. This makes the bars keep their shape and texture. With these steps, you can make delicious no-bake crunch bars for snacking or dessert.
Customizing Your Crunch Bars
Customizing no-bake desserts is fun, and crunch bars are no different. You can make unique flavors by trying different nuts, seeds, or cereals. Also, play with various sweeteners to get a special taste.
Dessert customization offers endless options. Try adding dried fruits, coconut flakes, or candy pieces for a sweet and salty mix. Customization is also about presentation. Get creative with shapes or toppings like melted chocolate and nuts.
Some popular ideas include:
- Adding a sprinkle of sea salt for a touch of savory flavor
- Mixing in some cinnamon or cocoa powder for a warm, spicy taste
- Using different types of milk, such as almond or soy milk, to create a non-dairy version
By trying different ingredients and styles, you can make a unique no-bake crunch bar. Don’t be afraid to experiment. It’s all part of the fun of customizing no-bake desserts.
| Customization Idea | Ingredients | Instructions |
|---|---|---|
| Sea Salt Crunch Bars | Sea salt, chocolate chips, nuts | Mix in sea salt and chocolate chips, top with nuts |
| Cinnamon Crunch Bars | Cinnamon, oats, honey | Mix in cinnamon and oats, drizzle with honey |
Common Mistakes to Avoid
When making no-bake crunch bars, it’s key to know common mistakes. These can mess up the texture and quality of your dessert. By following some simple tips, you can avoid these no-bake dessert problems.
Texture Problems and Solutions
Texture issues are common with no-bake crunch bars. This can happen if you use too much or too little of an ingredient. To fix this, stick to the recipe and measure your ingredients right.
Setting Issues Fixed
Setting problems can also pop up. This might be because the mixture wasn’t pressed in enough or didn’t cool properly. To solve this, press the mixture firmly into the pan. Then, let it cool and set for the right amount of time.
Storage Mistakes
Storing your no-bake crunch bars wrong can also be a problem. To avoid this, store them in an airtight container. Keep them away from sunlight and moisture.

Knowing these common mistakes and how to avoid them will help your no-bake crunch bars turn out great every time. Always follow the recipe, measure ingredients right, and store them properly. This way, you can dodge common no-bake dessert problems.
| Common Mistake | Solution |
|---|---|
| Texture problems | Follow the recipe carefully and measure the ingredients accurately |
| Setting issues | Press the mixture firmly into the pan and let it cool and set for the recommended amount of time |
| Storage mistakes | Store the bars in an airtight container and keep them away from direct sunlight and moisture |
Flavor Variations and Add-ins
No-bake desserts are perfect for getting creative. They let you try out many flavor variations and add-ins. This makes them a fun way to make unique and tasty treats.
There are countless ways to change up the flavors. You can use different chocolates like dark, milk, or white. Or, you can add nuts and seeds like almonds, walnuts, or chia seeds for extra texture and taste.
Chocolate Variations
Chocolate lovers will want to use the best chocolate. Look for brands like Ghirardelli or Lindt for a deep flavor. You can also mix in different chocolate chips or chunks for more texture and taste.
Nut and Seed Options
Nuts and seeds add great texture and flavor to your bars. Here are some popular choices:
- Almonds: sliced or slivered for added texture
- Walnuts: chopped or halved for a rich, nutty flavor
- Chia seeds: added for a nutty flavor and extra nutrition
Dietary Alternatives
If you have dietary restrictions, don’t worry. There are many alternatives. You can use vegan chocolate, gluten-free cereals, or nut-free options. This way, you can still enjoy a delicious treat that everyone can enjoy.
Storage and Shelf Life
Keeping your no-bake crunch bars fresh is key. When storing no-bake desserts, use an airtight container. This helps keep their quality high. The dessert shelf life depends on the ingredients and storage.
No-bake crunch bars can stay fresh for days in the fridge. Freezing them can extend their life for weeks. Here are some tips for storing no-bake desserts:
- Store them in an airtight container to keep them fresh
- Keep them in the refrigerator to prolong their shelf life
- Freeze them for longer storage and to preserve their texture and freshness
Follow these tips to enjoy your no-bake crunch bars longer. Always check the dessert shelf life before eating. This ensures they are still good to eat.
Serving Suggestions and Presentation Ideas
When serving no-bake desserts, how you present them matters a lot. Creative presentation ideas can make your no-bake crunch bars a hit. Try cutting them into bars, squares, or fun shapes with a cookie cutter.
For a fancy look, top your desserts with melted chocolate, nuts, or fresh fruits. This adds flavor and makes them look great. Serving desserts in a unique way can make your event memorable.

Plating Tips
- Use a variety of colors and textures to create a visually appealing plate.
- Consider adding fresh fruits or nuts to the plate for added flavor and texture.
- Experiment with different shapes and sizes of no-bake desserts to create a unique presentation.
Special Occasion Presentations
For special occasions, get creative with your dessert presentation. Arrange them on a platter or stack them high. You can also make a tower or pyramid with your no-bake crunch bars.
| Presentation Idea | Description |
|---|---|
| Platter Presentation | Arrange no-bake desserts on a platter in a creative pattern. |
| Stacked Presentation | Stack no-bake desserts high on a serving dish for a dramatic effect. |
Health and Nutrition Information
No-bake desserts can be good for you if you pick the right ingredients. Nuts and seeds add healthy fats and proteins. Some cereals bring fiber. This way, you can make a dessert that’s tasty and also good for you.
Thinking about the nutrition in homemade desserts is key. No-bake crunch bars are a treat but can be a healthier choice. Here are some tips:
- Choose ingredients that are high in fiber and protein
- Opt for natural sweeteners instead of refined sugars
- Be mindful of the calorie count and portion sizes
By choosing the right ingredients, you can enjoy the
Tips for Making Ahead and Batch Preparation
Batch dessert preparation can save a lot of time. Making large batches of no-bake crunch bars ensures you always have treats ready for any event.
No-bake desserts are great because they can be frozen for later. This is perfect for big gatherings or events. Just place them in an airtight container or freezer bag and store in the freezer for up to 3 months.
Freezing Guidelines
Freezing no-bake crunch bars right is key to keeping them good. Cool the bars completely before freezing to avoid ice crystals. Use an airtight container or freezer bag, and press out air before sealing.
Making Multiple Batches
It’s easy to make many batches of no-bake crunch bars. Just multiply the recipe and follow the usual steps. You can also add different toppings like nuts or dried fruit to each batch.
Here are some tips for making multiple batches:
- Use a large mixing bowl for each batch. Scrape down the sides to mix everything well.
- Use a cookie scoop or small ice cream scoop to portion the bars. This makes them all the same size.
- If you’re making batches with different toppings, label them clearly. This makes it easy to find what you need later.
By following these tips, you can easily make ahead no-bake desserts. This is great for feeding a crowd or keeping treats ready at home. It saves time and effort in the kitchen.
| Batch Size | Freezing Time | Storage Life |
|---|---|---|
| Small | 2 months | 5 days |
| Medium | 3 months | 7 days |
| Large | 4 months | 10 days |
Conclusion
As we wrap up our exploration of no-bake crunch bars, it’s clear they’re more than just a sweet treat. They’re a way to make lasting memories and bring happiness to those around us. Whether it’s for a special event or a cozy afternoon, these homemade desserts are sure to please.
No-bake crunch bars are easy to make and can be customized in many ways. With just a few ingredients and a bit of effort, you can create a dessert that’s not only delicious but also healthier. The journey of making these treats is rewarding and fun, from trying new flavors to finding the perfect texture.
Now that you know how to make these no-bake wonders, it’s time to get creative. Enjoy making these desserts and sharing them with your loved ones. Every bite is a moment of pure joy. Let’s look forward to the endless possibilities and the sweet memories these bars will create.
FAQ
What makes no-bake crunch bars special?
No-bake crunch bars are special because they’re easy to make. They need little equipment and can be tailored to many tastes. They’re great for both experienced and new cooks.
What are the essential ingredients for perfect crunch bars?
The key to perfect no-bake crunch bars is using crunchy elements like nuts or cereal. You also need binding ingredients like peanut butter or chocolate. Sweeteners like honey or sugar are important too. The quality of these ingredients greatly affects the taste and texture.
What kitchen tools are needed to make no-bake crunch bars?
To make no-bake crunch bars, you’ll need a mixing bowl, a spoon or spatula, and a pan or tray. A food processor or double boiler can also help. These tools can make the process easier and improve the results.
How do you make no-bake crunch bars?
Making no-bake crunch bars is simple. First, prepare the ingredients. Then, mix them together and set the mixture in a pan. The steps include grinding nuts or cereal, melting the binding ingredients, and combining everything. Let the mixture cool and set properly.
How can you customize no-bake crunch bars?
Customizing no-bake crunch bars is easy. Try different nuts, seeds, or cereals for crunch. Experiment with various binding ingredients or sweeteners. Adding dried fruits, coconut flakes, or candy pieces can also create unique flavors.
What common mistakes should you avoid when making no-bake crunch bars?
When making no-bake crunch bars, avoid texture and setting problems. Too much or too little of an ingredient can cause issues. Make sure to press the mixture firmly into the pan and let it cool properly. Storing them in an airtight container is also key to keeping them fresh.
What are some flavor variations and add-ins for no-bake crunch bars?
No-bake crunch bars offer endless flavor possibilities. Try different chocolates, nuts, and seeds for unique tastes and textures. For dietary restrictions, consider vegan chocolate or nut-free options.
How should no-bake crunch bars be stored and what is their shelf life?
Storing no-bake crunch bars properly is crucial. Keep them in an airtight container in the fridge or freezer. Their shelf life depends on the ingredients but generally, they last several days in the fridge and weeks in the freezer.
How can no-bake crunch bars be served and presented?
Serving and presenting no-bake crunch bars can be fun. Cut them into bars, squares, or use cookie cutters for shapes. For a fancy look, top them with melted chocolate, nuts, or fresh fruits. Get creative with arrangements for special occasions, like stacking them or displaying on a platter.
What are the health and nutrition benefits of no-bake crunch bars?
No-bake crunch bars can be a healthy treat if made right. Nuts and seeds offer healthy fats and proteins, while some cereals provide fiber. Just be mindful of the sugar content and calorie count to ensure they’re nutritious and delicious.
How can you make no-bake crunch bars ahead of time and in batches?
No-bake crunch bars are great for making ahead and in batches. Doubling or tripling a recipe is perfect for big events. Freezing is a good option for keeping them fresh for longer.
Ingredients
⅓ cup (105 g) maple syrup (or any other liquid sweetener)
½ cup (120 g) peanut butter (+ 1/3 cup more if you like/see notes)
¼ tsp sea salt (optional/see notes)
1 tsp vanilla extract
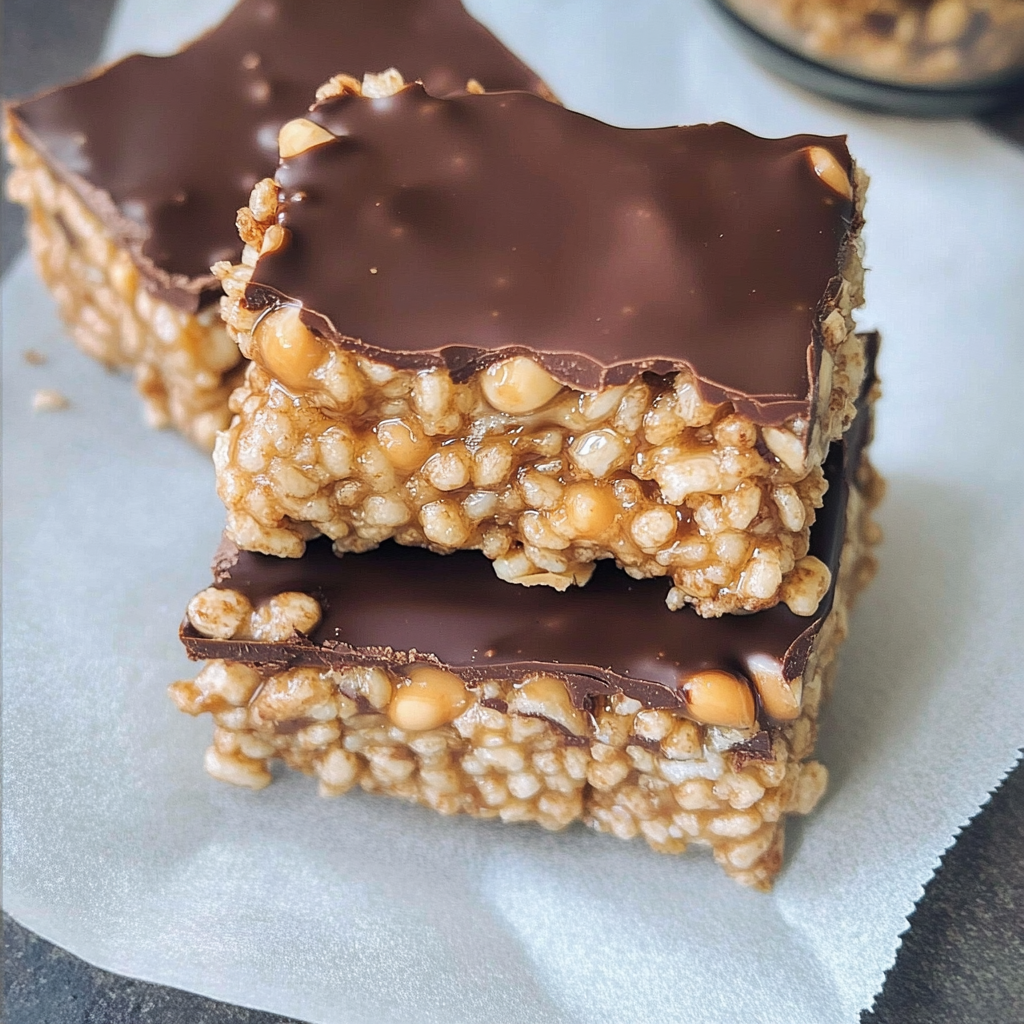
3 cups (130 g) rice puffs
5 oz (140 g) dark chocolate chips (dairy-free)
Instructions
Check the video in the post for easy visual instructions. I recommend using a kitchen scale for this recipe.
Line a 6×6 inch (ca. 15 cm) pan or 7×7 inch (ca. 18 cm) pan with parchment paper. You can also use an 8×8 inch (ca. 20 cm) pan, however, the bars will be less thick.
Add liquid sweetener, 1/2 cup peanut butter, vanilla extract, and salt to a bowl, and stir to combine.
Add the rice puffs to the bowl and stir until the rice cereal is well-coated. Depending on the size of the rice puffs, you will need 2 1/2 to 3 cups.
Spread the mixture in the pan and press it down as firmly as possible with a spatula. You can also use the bottom of a jar to compress the mixture.
I added 1/3 cup peanut butter in addition on top, but this step is optional!
Melt the chocolate chips in a double-boiler or in a microwave and pour the melted chocolate over the peanut butter cereal mixture. Spread it evenly.
Put the pan in the fridge for about 60 minutes (or in the freezer for a shorter time).
Cut into bars (which works best with a hot knife) and enjoy! Store leftovers in an airtight container in the fridge.
