Cherry Poke Cake
Prep Time: 15 minutes | Bake Time: 30 minutes | Chill Time: 4 hours | Serves: 12
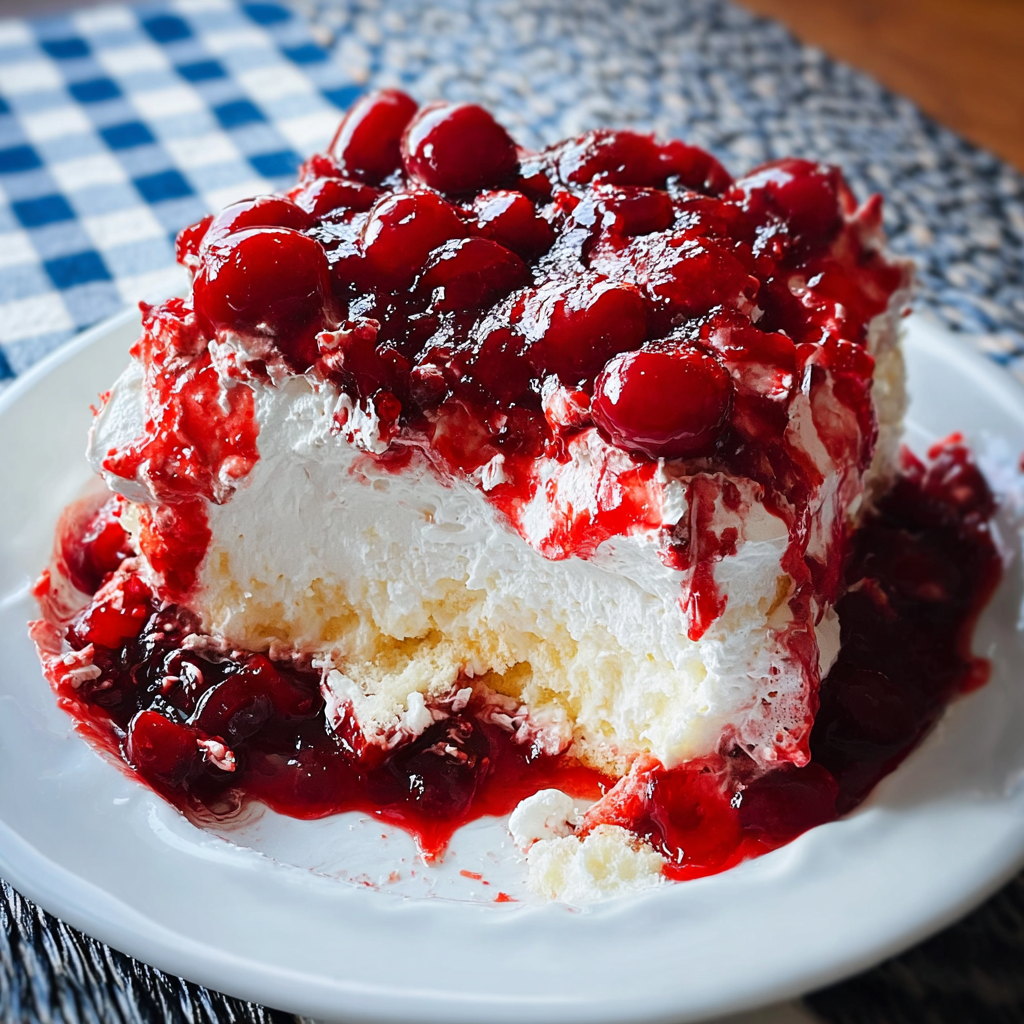
There are certain desserts that have been showing up at potlucks, church suppers, birthday parties, and Fourth of July cookouts for so long that they have earned a permanent spot in the American dessert hall of fame. Cherry Poke Cake is one of them. A soft, fluffy white cake soaked with sweet cherry gelatin until every single bite is bursting with fruit flavor, topped with a cloud of creamy frosting and a generous layer of glossy cherry pie filling — this is the kind of dessert that has people circling back to the dessert table for a second slice before they have even finished their first.
And the best part? It is one of the easiest cakes you will ever make. No stacking layers, no crumb coating, no fancy decorating. Just bake, poke, soak, chill, and top. Done.
Why You’ll Love This Recipe
This cake checks every single box. It is stunning to look at — those gorgeous streaks of deep red cherry gelatin running through the white cake are nothing short of showstopping when you pull that first slice. It is incredibly moist and flavorful thanks to the gelatin soaking all the way down into every poke hole. It feeds a crowd straight from a 9×13 pan. It can be made a day ahead. And perhaps most importantly — it tastes absolutely incredible.
It is simple to make, perfect for prepping ahead, and always a hit at potlucks, holidays, and family events. Whether you are bringing it to a summer cookout, making it for a holiday gathering, or just craving a big, beautiful pan of something sweet — this cake never disappoints.
What Is a Poke Cake?
If you have never made a poke cake before, get ready to fall in love with the concept. A poke cake starts with a simple box cake and takes it to another level with a few simple steps — a moist, tender white cake soaked with cherry gelatin for a burst of fruity goodness in every bite, then topped with a creamy layer of whipped topping and a mountain of sweet cherry pie filling.
The magic happens when you poke holes all over the warm cake and pour the liquid gelatin over the top. The gelatin seeps down through the holes and into the crumb, infusing every single bite with cherry flavor and creating that unmistakably moist, almost pudding-like texture that makes poke cakes so uniquely irresistible. It is rich, tangy, sweet, and straight-up delicious — one bite and you will never look at a cake mix the same way again.
A Little Background
Every generation has their own version of a poke cake. The poke cake concept took off in America in the 1970s when Jell-O began appearing in everything from salads to desserts, and home bakers discovered that pouring liquid gelatin over a warm cake created something truly magical. Decades later, Cherry Poke Cake remains one of the most popular versions — beloved for its vibrant color, crowd-pleasing flavor, and the nostalgia it carries with every slice.
What Makes This Recipe Work
- The double cherry hit — both cherry gelatin and cherry pie filling mean this cake is absolutely packed with cherry flavor from top to bottom. With both cherry gelatin and cherry pie filling, this poke cake has tons of cherry flavor — it is practically swimming in cherries.
- Poking while warm — the warm cake absorbs the gelatin much more readily than a cold one. Do not skip this step and do not wait too long after pulling the cake from the oven.
- The cream cheese frosting layer — whipped cream cheese folded with Cool Whip creates a frosting that is light, fluffy, and just rich enough to balance the sweetness of the cherry topping without weighing the cake down.
- Overnight chilling — the longer this cake sits in the refrigerator, the better it gets. Making it the day before is not just convenient — it actually improves the flavor and texture significantly.
Ingredients
For the Cake
- 1 box (15.25 oz) white cake mix, plus ingredients listed on the box
- 1 tsp vanilla extract
- 1 tsp almond extract
For the Cherry Gelatin Soak
- 1 box (3 oz) cherry flavored gelatin (Jell-O)
- 1 cup boiling water
- ½ cup cold water
For the Cream Cheese Frosting
- 8 oz cream cheese, softened to room temperature
- 1 cup powdered sugar, sifted
- 1 tsp vanilla extract
- ½ tsp almond extract
- 8 oz Cool Whip (whipped topping), thawed
For the Topping
- 21 oz canned cherry pie filling (one and a half cans for the best coverage)
- Maraschino cherries for garnish (optional)
Instructions
Step 1 — Bake the Cake
Preheat your oven to 350°F (175°C). Grease a 9×13-inch baking pan generously with cooking spray and set aside.
Prepare the white cake mix according to the directions on the box, adding the vanilla extract and almond extract to the batter. The almond extract is a small addition that makes a surprisingly big difference — it gives the cake a subtle, bakery-style flavor that pairs beautifully with the cherries.
Pour the batter into the prepared pan and bake according to package directions, usually 28 to 32 minutes, until a toothpick inserted into the center comes out clean. Remove from the oven and place on a wire rack.
Step 2 — Poke the Holes
Allow the cake to cool for about 15 minutes — you want it warm but not scorching hot. This is the window where the magic happens best.
Using a wooden skewer, a meat fork, or the handle end of a wooden spoon, poke holes all over the entire surface of the cake, spacing them about every half inch. Do not be shy — more holes means more cherry flavor soaking into every bite. Poke all the way down to the bottom of the cake.
Step 3 — Make the Cherry Gelatin Soak
In a heatproof bowl or measuring cup, dissolve the cherry gelatin in 1 cup of boiling water, stirring continuously until completely dissolved with no granules remaining — about 2 minutes. Stir in ½ cup of cold water.
Slowly and evenly pour the warm cherry gelatin over the entire surface of the cake, making sure to cover every inch and paying special attention to the holes. The gelatin will absorb down through the holes and into the crumb — you will see it soaking in as you pour. Pour slowly so none of it runs off the edges.
Step 4 — First Chill
Allow the cake to cool completely at room temperature, then cover with plastic wrap and refrigerate for at least 30 minutes — or up to 2 hours — until the gelatin has fully set and the cake is completely cold. Do not frost a warm cake; the frosting will slide right off.
Step 5 — Make the Cream Cheese Frosting
In a large bowl, beat the softened cream cheese with an electric mixer on medium-high speed for 2 to 3 minutes until completely smooth and fluffy. Add the sifted powdered sugar, vanilla extract, and almond extract and beat until well combined and silky smooth. Scrape down the sides of the bowl.
Add the thawed Cool Whip and fold it in gently with a rubber spatula until just combined and the frosting is light, airy, and uniform. Do not overmix — you want to keep as much of that fluffy, cloud-like texture as possible.
Step 6 — Frost the Cake
Remove the chilled cake from the refrigerator. Spread the cream cheese frosting evenly over the entire surface of the cake, all the way to the edges. Use an offset spatula or the back of a large spoon to create a smooth, even layer.
Step 7 — Add the Cherry Topping
Spoon the cherry pie filling evenly over the frosting layer, spreading it out to cover the surface. One can of cherry pie filling is not quite enough, but two full cans is almost too much — one and a half cans seems like the perfect amount, but you be the judge. If you have leftover cherry pie filling, save it — it is incredible spooned over vanilla ice cream.
Step 8 — Final Chill and Serve
Cover the cake loosely with plastic wrap and refrigerate for at least 4 hours before serving. Overnight chilling is strongly recommended — the layers set beautifully and the flavors meld together into something truly special.
When ready to serve, cut into 12 squares. For clean, picture-perfect slices that show off the gorgeous layers, wipe the knife blade between each cut. Garnish with maraschino cherries if desired and serve cold.
Recipe Notes
- Let the cream cheese get really soft. Take it out of the refrigerator at least an hour before you start. Cold cream cheese will not beat smoothly and will leave lumps in your frosting no matter how long you mix.
- Poke all the way to the bottom. Shallow holes mean the gelatin only soaks the top layer. Push the skewer or fork all the way down to the bottom of the pan for full flavor from top to bottom.
- Pour the gelatin slowly. Take your time and pour it evenly over the entire surface. A slow, steady pour gives the cake time to absorb properly rather than having it pool in some spots and miss others.
- Do not rush the chill time. This cake genuinely gets better the longer it sits. If you can make it the night before, do it — it is one of those rare desserts that is actually at its best the next day.
- Use your favorite cake mix brand. Duncan Hines and Betty Crocker are favorites for this recipe — both produce a light, tender crumb that holds up well to the gelatin soak.
- The almond extract is the secret. It is optional but highly recommended — it gives the cake that subtle, hard-to-place bakery flavor that makes people ask what your secret is.
- Save extra cherry filling. Any leftover cherry pie filling is perfect spooned over vanilla ice cream, stirred into yogurt, or used as a topping for pancakes or waffles.
Variations
Black Forest Poke Cake — Use a chocolate cake mix instead of white and follow the same recipe. The combination of chocolate, cherry gelatin, and cherry pie filling creates a Black Forest-inspired poke cake that is absolutely incredible.
Strawberry Poke Cake — Swap the cherry gelatin for strawberry gelatin and use strawberry pie filling on top for a beautiful pink and red version that is perfect for Valentine’s Day or spring gatherings.
Lemon Cherry Poke Cake — Use a lemon cake mix as the base for a bright, citrusy contrast to the sweet cherry. The tartness of the lemon and the sweetness of the cherry are a surprisingly perfect pairing.
Lighter Version — Use reduced-fat cream cheese, light pie filling, sugar-free gelatin, and fat-free or sugar-free whipped topping for a lighter take that still delivers all the flavor.
Fresh Cherry Version — Skip the canned pie filling on top and use 2 cups of fresh pitted cherries tossed with 2 tablespoons of sugar and a squeeze of lemon juice for a fresher, less sweet topping that lets the natural cherry flavor shine.
Mini Individual Poke Cakes — Bake the batter in a muffin tin, poke holes in the top of each cupcake, drizzle with the gelatin, chill, and top with a dollop of frosting and a single cherry. Perfect for parties and individual servings.
Make-Ahead Tips
This cake is a dream for entertaining because it is even better made in advance:
- Make the entire cake including the cherry topping up to 24 hours ahead and refrigerate overnight.
- The frosting can be made up to 2 days ahead and stored covered in the refrigerator.
- The baked, unfrosted cake can be wrapped tightly and frozen for up to 2 months — thaw overnight in the refrigerator before adding the gelatin soak and frosting.
Storage
Refrigerator: Cover tightly with plastic wrap and store in the refrigerator for up to 5 days. This cake actually tastes better on day two and three as the flavors continue to develop.
Freezer: The frosted, assembled cake does not freeze well due to the gelatin and whipped topping. However, the plain baked cake (before the gelatin soak) freezes beautifully for up to 2 months. Thaw overnight in the refrigerator and then proceed with the gelatin soak and frosting steps.
Did you make this Cherry Poke Cake? Leave a comment below and let us know how it turned out! Tag us on social media — we love seeing your beautiful cakes.